General Tools
The toolbar located at the top of the Source and New panels appears when files are uploaded into Verify.
The tools provide you with options to change the page display and navigation (Page rotation, zooming, panning, etc.).
Note: The toolbar remains visible across all stages of the inspection (Prep, Results, and Report)

Thumbnail Panel
The 1. Thumbnail Panel previews the file’s corresponding pages for quick navigation within any multi-page document.
Additionally, this view allows you to check/uncheck pages that you want to include/exclude during the inspection.

Page Navigation
2. Page Navigation allows you to select which page to display.
Click the up/down arrows on the Page Navigation box to change the pages. Hit enter to apply.
Alternatively,
Enter the page number directly in the Page Navigation box. Hit enter to apply.
Zoom
To 3. Zoom, Click + or - on both Source or New documents.
Or,
Ctrl+Scroll upward with the trackwheel.
Or,
Ctrl + Scroll downward with the trackwheel.
Additional Zoom Options
Additional 4. Zoom Options allow you to change the Zoom/Page view levels using the items in this dropdown, including the possibility to lock in the zoom setting with the locket symbol.
Fit to Width
Fit either the Source or New file to its width.
Fit the Page
Fit the entire page in the Source or New panel.
By Zoom in/out Value
Choose between different zoom values from the list. The range is between 10% and 800%
Marquee Zoom
Used as a faster way to zoom into a particular area.
To Zoom into an area with Marque Zoom:
Click
Marquee Zoomthen click and ‘crop’ the desired region. Once you unclick, an automatic zoom is performed onto the selected area.To disable Marquee Zoom, click the dropdown again and select
Cancel Marquee Zoom.
Rotate Right
To rotate the Source/New file 90º clockwise, click on 5. Rotate Right.

Note: Only the active page is rotated, not the entire document
Sync Scrolling
6. Sync Scrolling allows for simultaneous scrolling between the Source and New Panels. This also allows for synchronized panning and zooming.
When enabled, the Sync Scrolling button turns red. Click again to disable it.
Report
7. Report allows you to download your desired inspection report in just one click.
Note: The Report button does not appear in the Prep stage of your inspection, only the Results stage.
Settings
The options under the 8. Settings icon allows you to display live text and/or any annotations made on the uploaded documents.

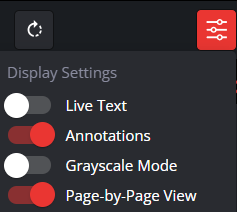
Prep Stage Display Settings
In the Prep Stage, you will have three Display Settings to choose from. They are:
Live Text
Annotations
Grayscale Mode
Page-by-Page View
Live Text Toggle Button
The Live Text toggle shows all live text in the Source or New panel by highlighting all areas containing live text.
To Show Live Text:
Toggle on or off the corresponding Live Text button
It is toggled off by default
Show Annotations Toggle Button
The Annotations toggle displays existing annotations on both Source and New files in both the Prep and Results stages.
To Show Annotations:
Toggle on or off the corresponding Annotations button
It is toggled on by default
Grayscale Mode Button
The Grayscale Mode toggle turns your files into grayscale, removing all color from your files.
To Turn on Grayscale:
Toggle on or off the corresponding Grayscale button
It is toggled off by default
Page-by-Page View:
For larger documents with multiple pages, you will see a performance improvement with the page by page view. Allowing you to navigate results with greater reactivity.
You can turn it off to switch back to the continuous page view.
To learn how to better prepare your files for inspection, visit the Preparing Files page in the Verify User Guide
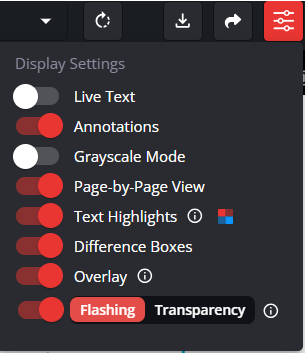
Results Stage Display Settings
In the Prep Stage you will have five Display Settings to choose from. They are:
Live Text
Annotations
Grayscale Mode
Text Highlights
Difference Boxes
Overlay
Flashing / Transparency
Text Highlights Toggle Button
Text Compare differences are now highlighted in red by default. The Text Highlights toggle turns the highlights on and off in the Source or New panel.
To Turn Text Highlights On and Off:
Toggle on or off the corresponding Text Highlights button.
It is toggled on by default.
Differences Boxes Toggle Button
The Difference Boxes toggle turns the Differences Boxes on and off in the Source or New panel.
To Turn Differences Boxes On and Off:
Toggle on or off the corresponding Differences Boxes button.
It is toggled on by default.
Overlay Toggle Button
The Overlay toggle turns the grey Overlay (the background that surrounds differences) on and off in the Source or New panel.
To Turn Overlay On and Off:
Toggle on or off the corresponding Overlay button.
It is toggled on by default.
Flashing Toggle Button
The Flashing toggle turns Graphics Flashing on and off in the New panel. It flashes the surrounding area, pixel by pixel, for more context on your graphics differences and image matches.
To Turn Flashing On and Off:
Toggle on or off the corresponding Flashing button.
It is toggled on by default.
Transparency Overlay
As an alternative to flash mode you can now view your graphics results in Transparent mode.
Overlaying your graphics inspection results, your markups or your whole document on top of one another with an opacity filter.
To learn how to better view your inspection results, visit the Viewing the Results page in the Verify User Guide