Verify CheckAI - User Guide
CheckAI User Guide
How to run compliance checks on your artwork and label content using Verify CheckAI.
What is CheckAI?
CheckAI is an AI-powered compliance co-pilot designed for CPG companies to automate the review of labels and artwork against global regulatory requirements and internal brand guidelines.
It is used to streamline compliance by identifying complex errors—such as incorrect allergen declarations, font size violations, and contextual spelling mistakes—to ensure accuracy across global markets.
Key Capabilities include:
Multi-language Support: Handles major languages including Arabic, Thai, and Chinese.
Global Coverage: Automatically detects and applies regulations for different jurisdictions like the FDA and Health Canada.
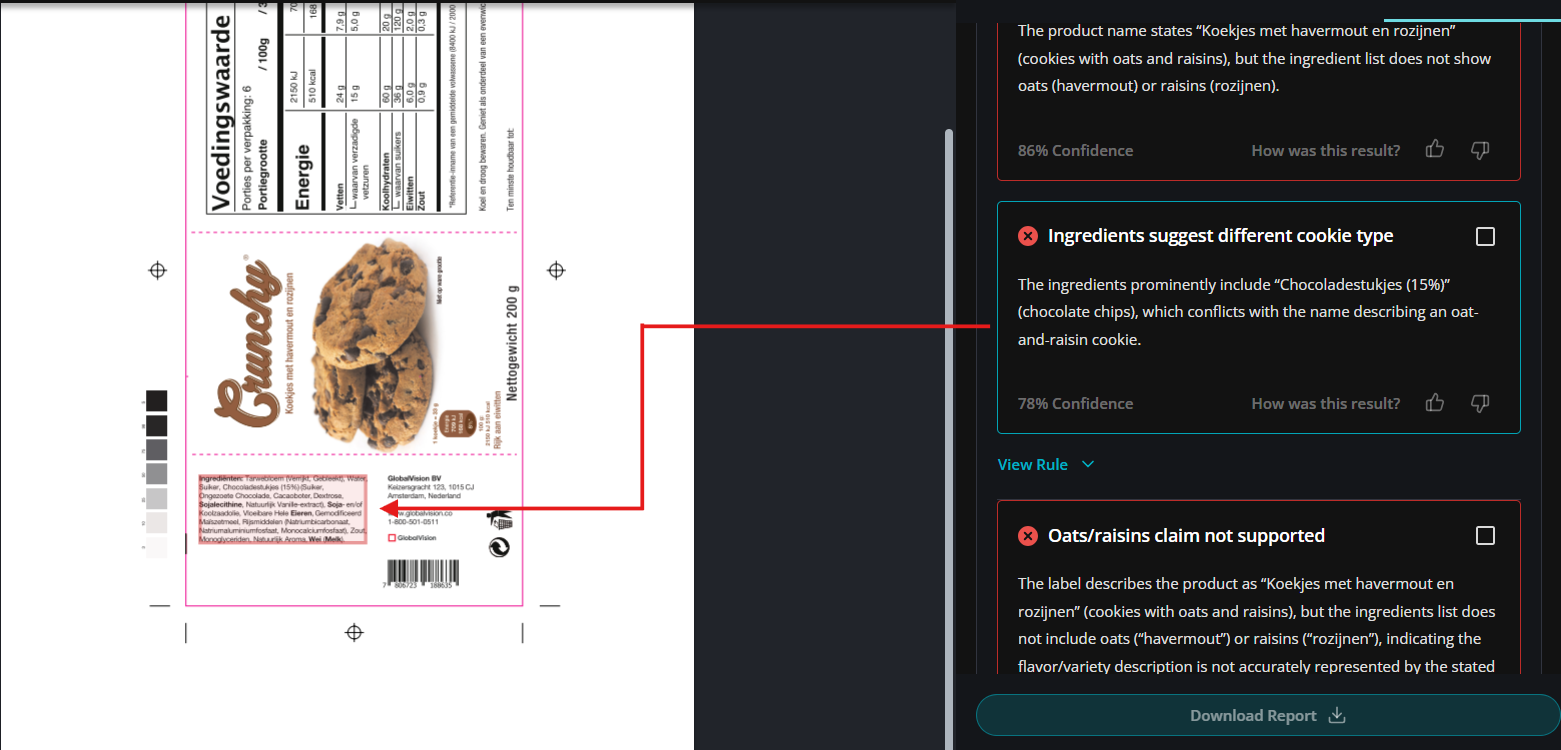
Intelligent Validation: Verifies mathematical consistency (e.g., "Per 100g" vs "Per Serving") and flags imagery conflicts (e.g., text says "Chocolate Chip" but the image shows "Oatmeal Raisin").
Workflow Overview
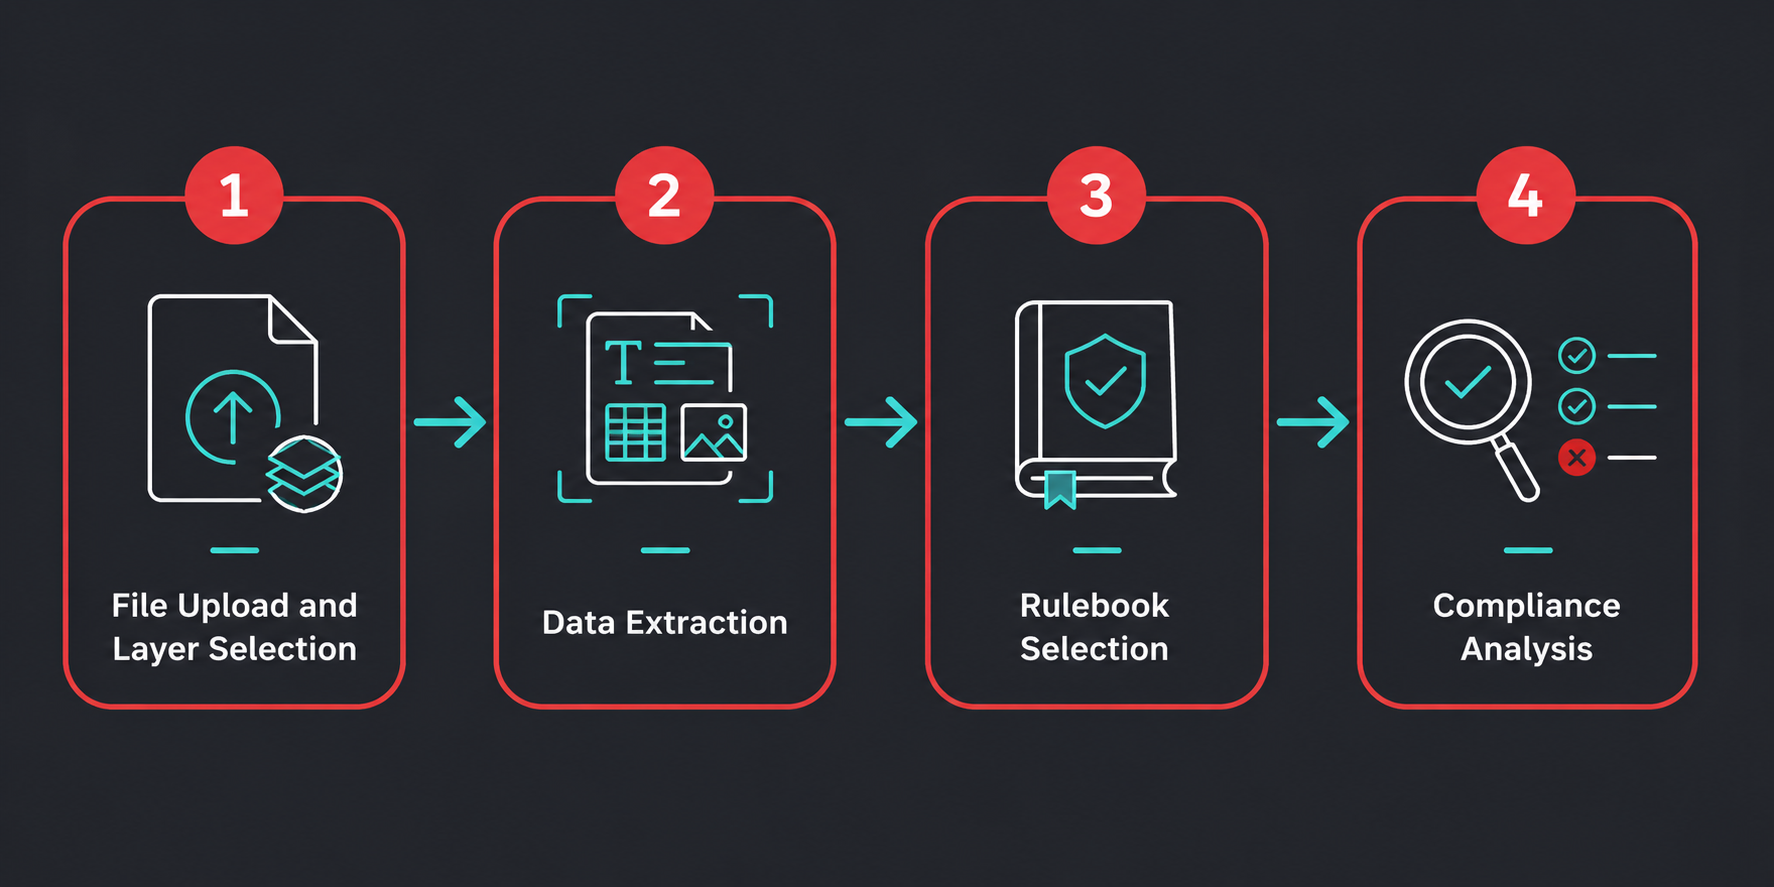
At a high level, the Verify CheckAI workflow is structured into the following phases:
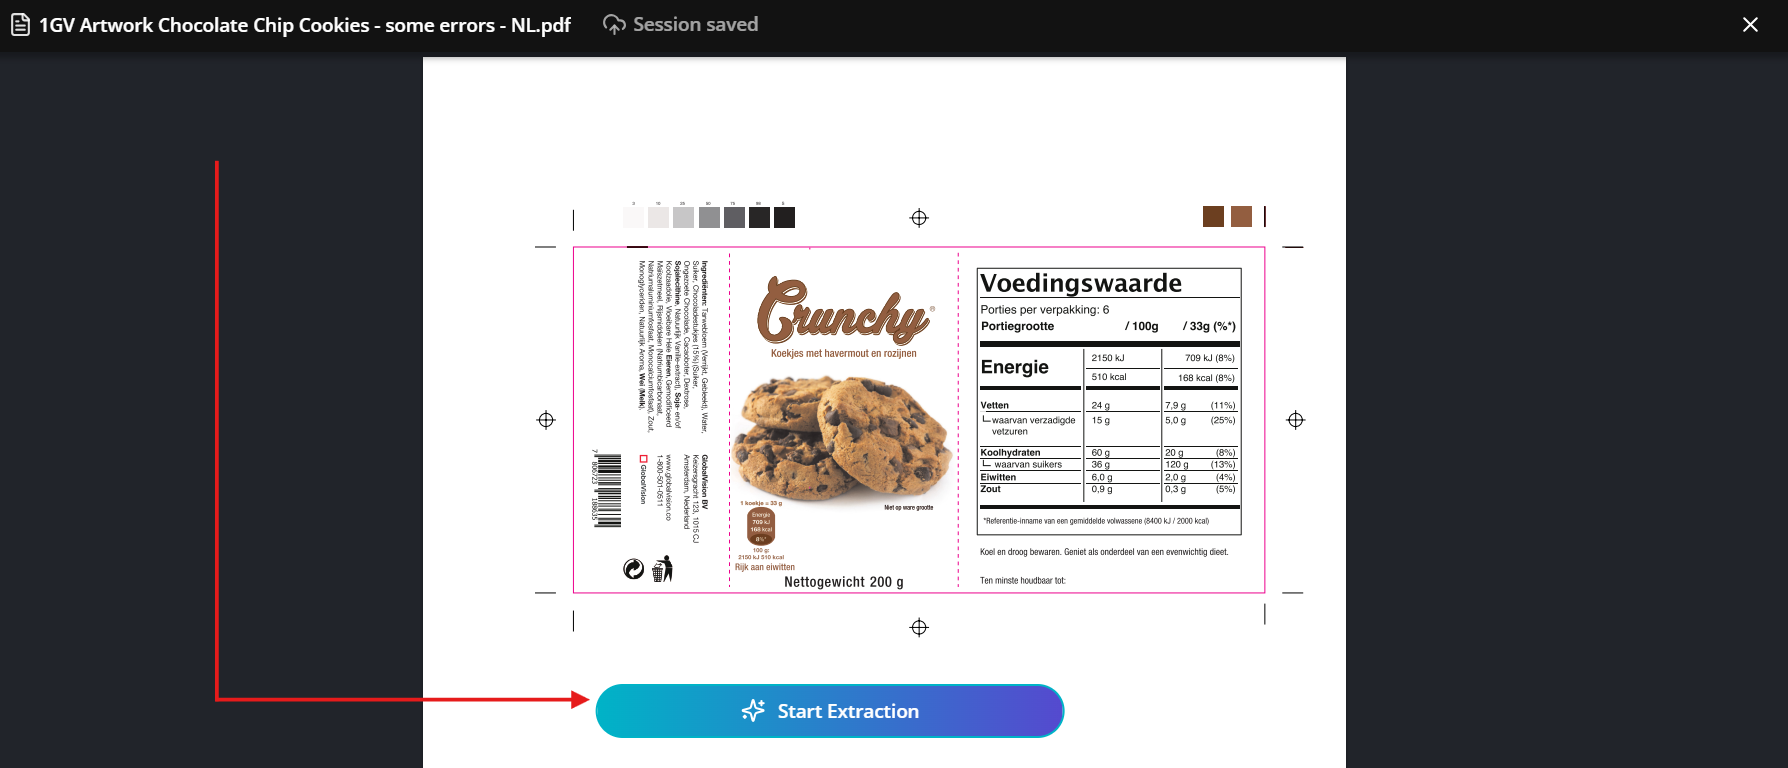
First, users upload their artwork or document and define which layers or content should be included in the analysis, allowing for greater control over what is evaluated.
Second, the ‘Start Extraction’ begins. The system starts understanding and categorizing your uploaded document. It parses sections of the file and identifies key elements and categories.
Third is the 'rules' stage, which allows you to select which rulebooks you would like to compare your document against. You can check for compliance against internal rules, or externally fetched regulations.
Finally, the fourth stage is where the software checks for compliance based on its analysis of your uploaded file and your selected rules, cross referencing and analyzing the extracted data to detect errors, inconsistencies, and potential risks before production.
The following user guide will breakdown each of these steps into further detail.
0.0 Getting Started
User Login
Domain Access to CheckAI |
|---|
This is where you log in to Verify CheckAI.
Your login credentials are the same as your Verify account.
Access to CheckAI is managed through the Verify platform. Users log in using the same credentials as their Verify account.
If you need help accessing your account or are experiencing issues logging in, please refer to the Verify Login help center article for guidance.
Tenant Management
User access and account management are handled through the Verify platform.
To add new users as an admin, follow the process outlined in the “My Team” section of the Verify admin guide.
User provisioning, access control, and account management are all handled within Verify, including SSO configuration and tenant-level settings. Once a user has been provisioned in Verify, they can log in to CheckAI using their existing Verify credentials.
Tenant admin guides for verify can be found here: Verify Admin Guide
1.0 - Loading Files and Selecting Layers
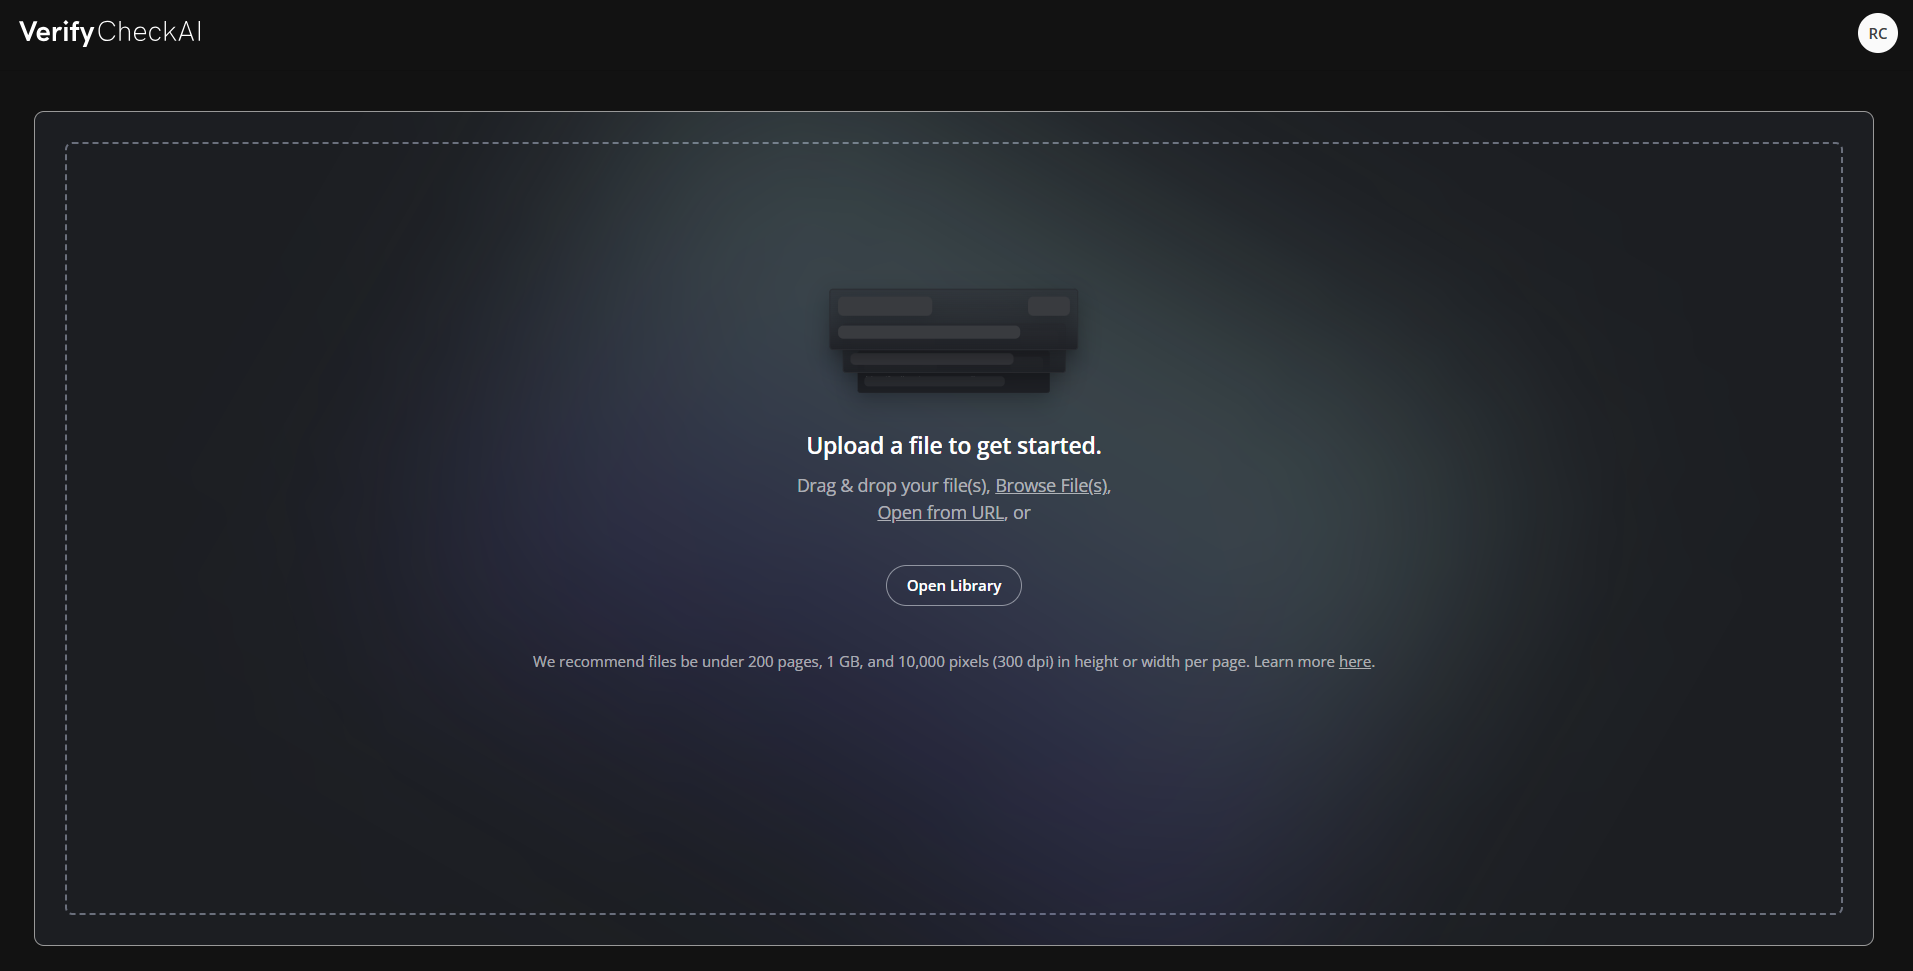
Uploading a file
Drag and drop a file into the main window to upload it.
You can also select ‘Browse Files’ to open a file explorer and navigate to your document.
If you have already uploaded a file in the past, it will be available in the library, which can be accessed by clicking 'Open Library”
Supported File Types:
DOC/DOCX
PPT/PPTX
PDF
XLS/XLSX
XML
PNG
JPG
JPEG
TIFF files
ZIP files (only containing SPL documents)
CSV
AI (in compatibility mode)
HTML
Document Controls
The document controls are located in the left-hand panel and provide tools to help you navigate and adjust your file during review. These controls include options for managing layers, as well as standard viewing functions such as page selection, rotation, zooming in and out, and fitting the document to the screen.
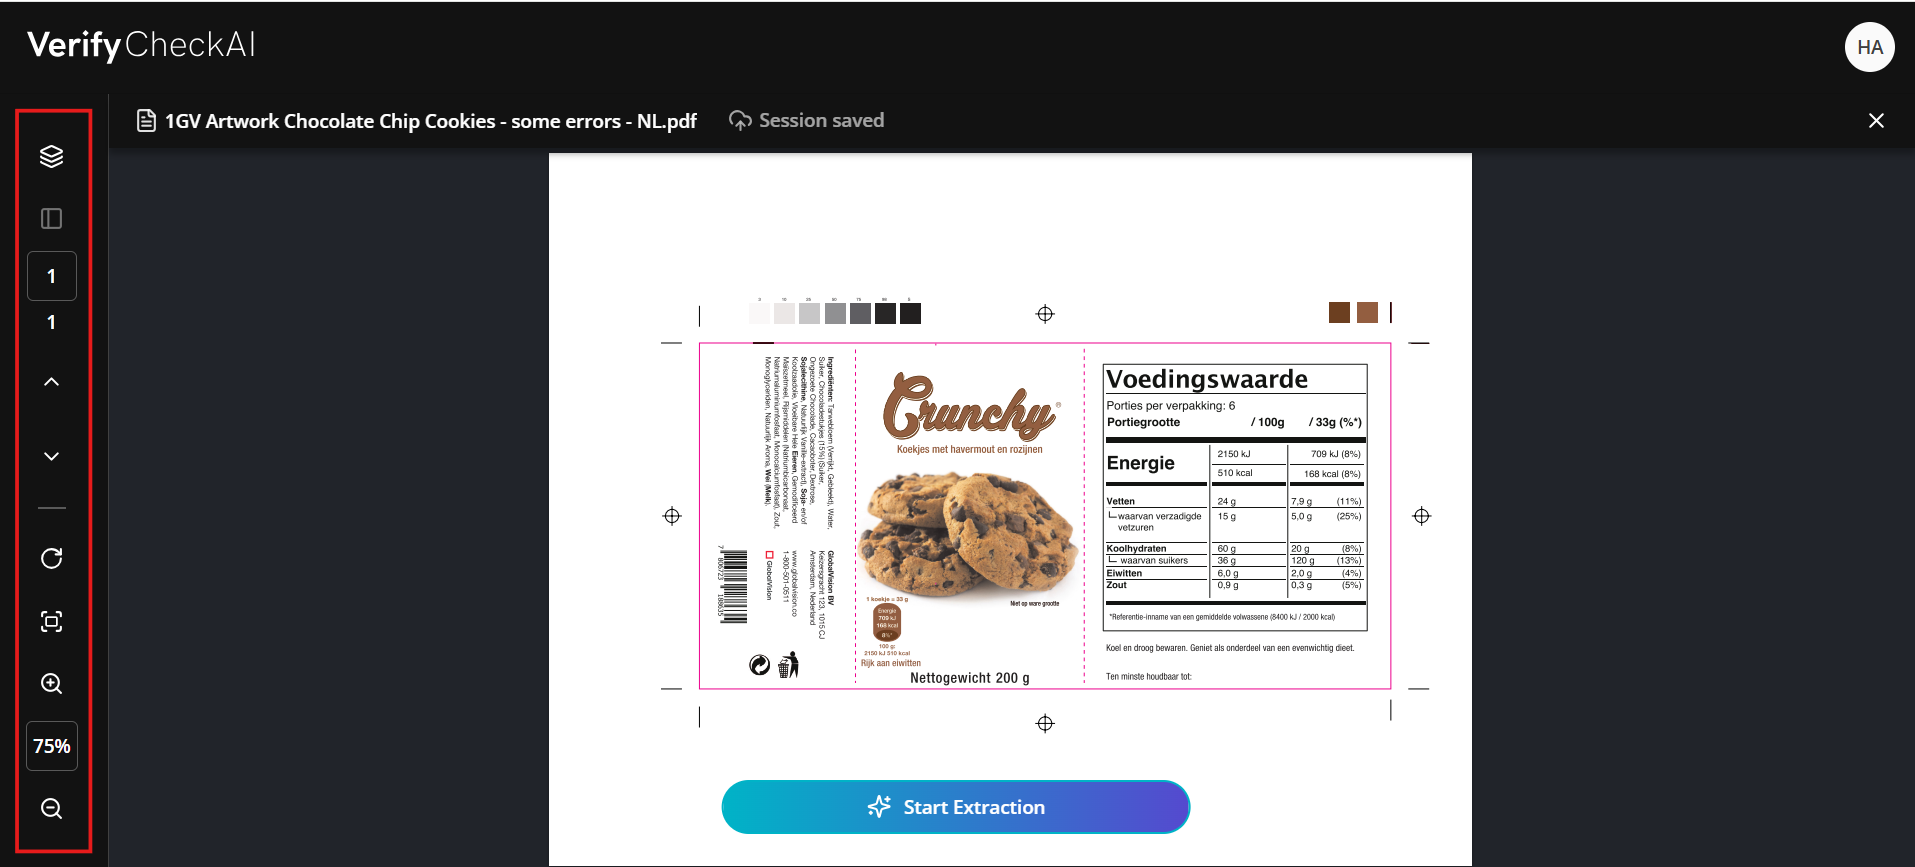
Selecting Layers
Layer selection allows you to control exactly what content is included in the analysis.
After uploading a file, you can choose which layers to make visible before starting the extraction process.
NOTE: Only the layers that are turned on will be analyzed by CheckAI, while any layers that are hidden or turned off will be excluded.
This ensures that only the relevant elements of your artwork or document are evaluated, giving you more precise and intentional results.
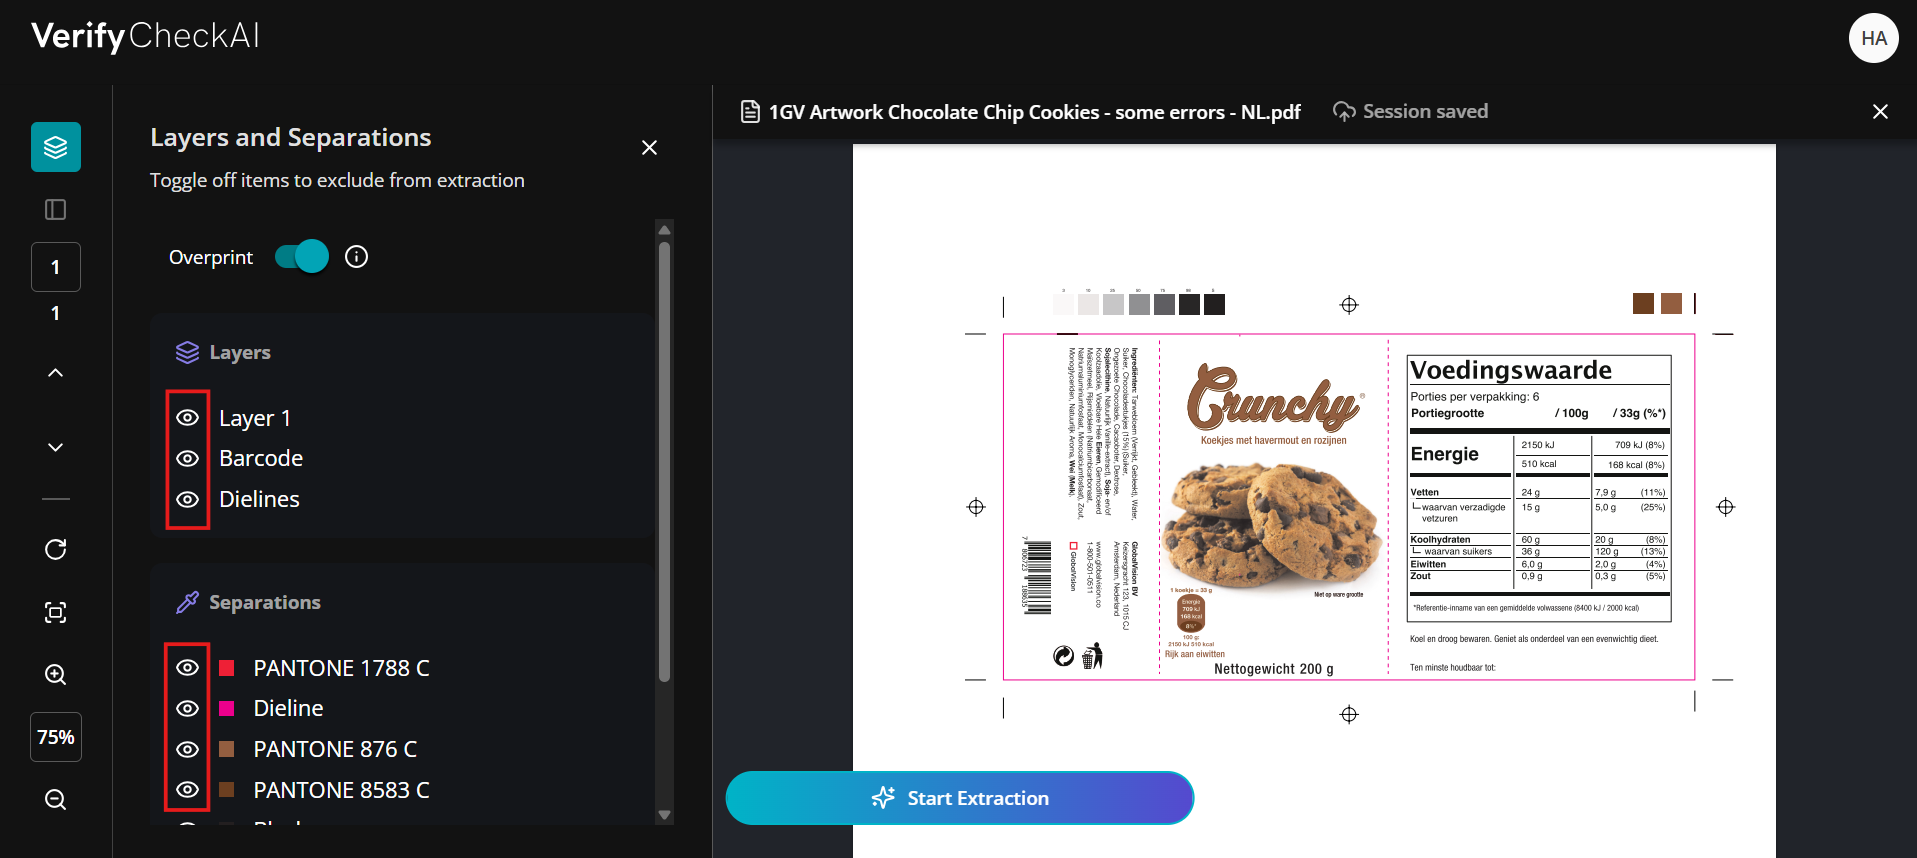
Excluding layers: If you have technical layers showing dimensions, die lines or cut lines that may not be directly relevant to a compliance review, it is recommended to turn those off so that they don’t interfere with the system’s analysis.
Click the layer visibility toggle in the layer controls to a hide irrelevant layers which are not pertinent to your inspection. These will be excluded from the compliance analysis.
2.0 - Beginning Extraction
When you click Start Extraction, the system begins to understand your document by analyzing its key components and organizing the content into structured categories.
This process focuses on content elements such as text and tables, and prepares them for further review and compliance analysis.
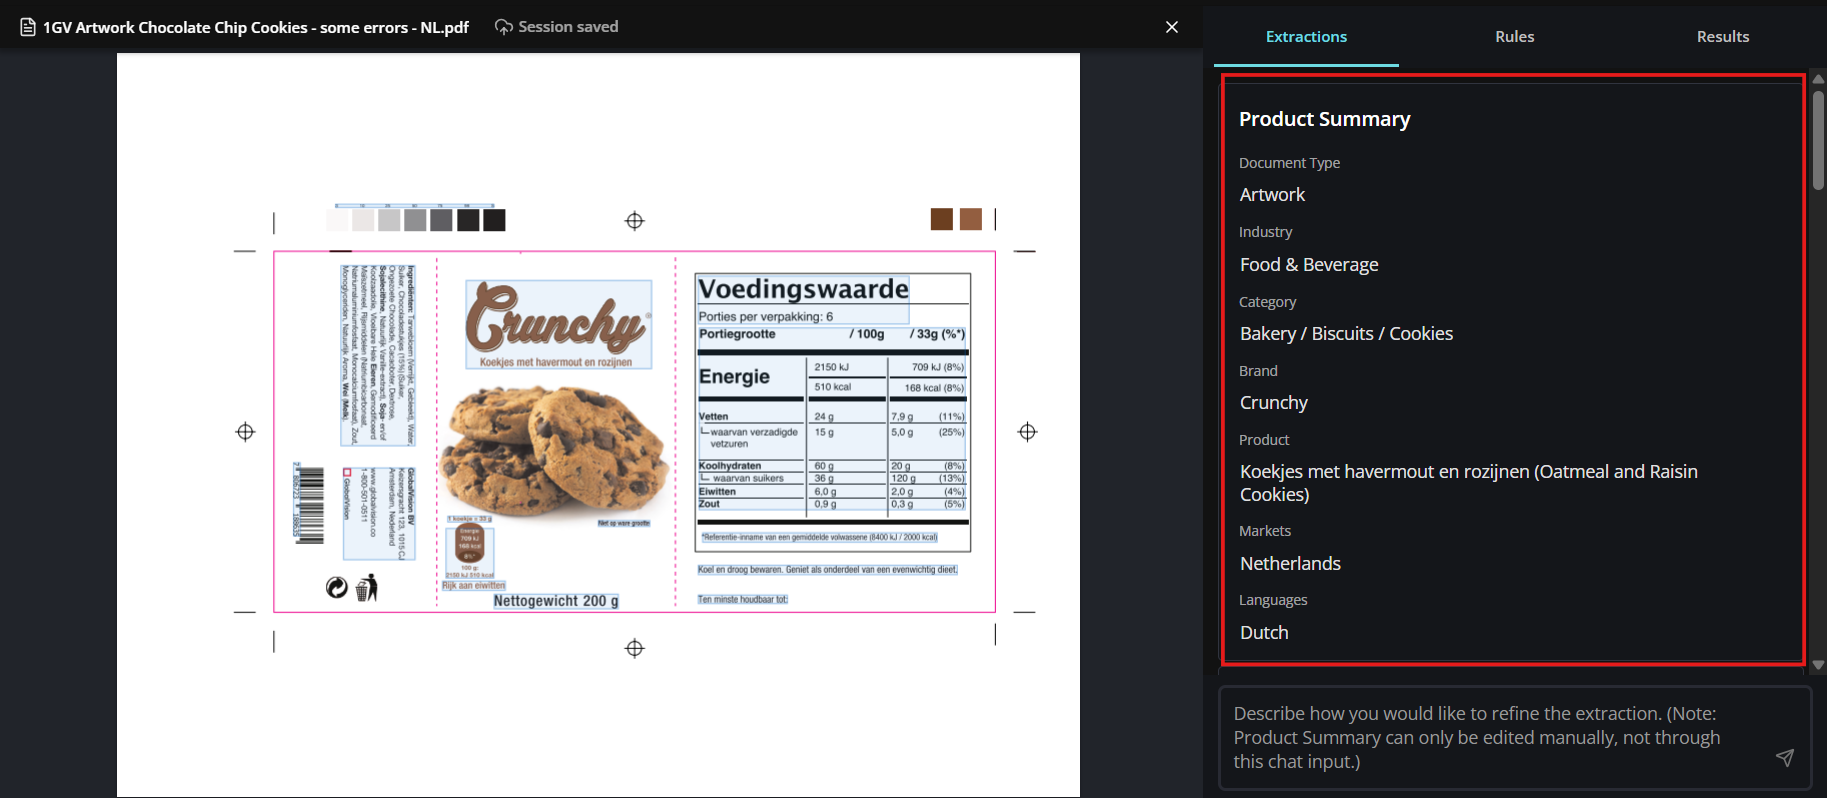
Product Summary
The system identifies the industry, brand, and target market by country.
This is editable; if the AI misidentifies the market, you can manually override it to ensure the correct regulations are applied.
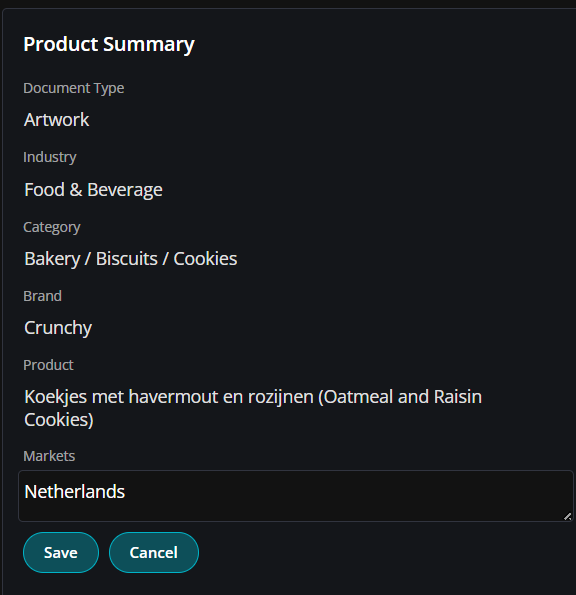
Editing Product Summary
Each field is editable so that you can change or refine the data in the Product Summary as needed.
Click on the edit icon next to a field to make and save changes.
Note: The ‘Product Summary’ information informs how the software will fetch regulatory rules.
It determines how CheckAI interprets your document and which rules are applied during analysis, therefore it’s important that the information is accurate.
Be sure to review the Product Summary and make any edits to refine the accuracy if you need to.
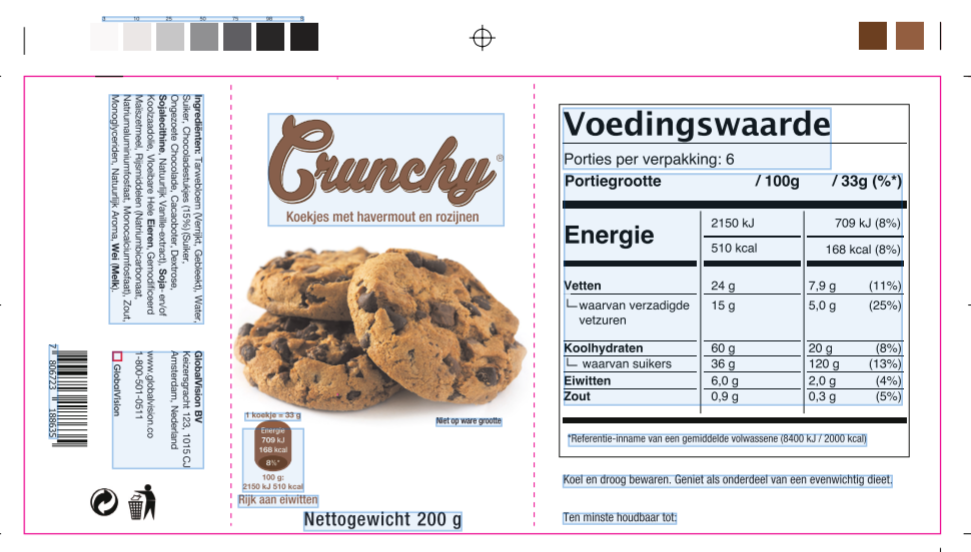
Content Categorization
Content Extraction Panel
In the content section of the extraction panel, the AI "reads" the document like a human, identifying elements such as the ingredient list, nutrition facts table, and net weight quantity.
Each detected section is highlighted on your document viewer.
Each highlight points to a linked category, and all detected categories are described in the extraction panel.
Categories and their content can be edited individually or in bulk using the refine feature.
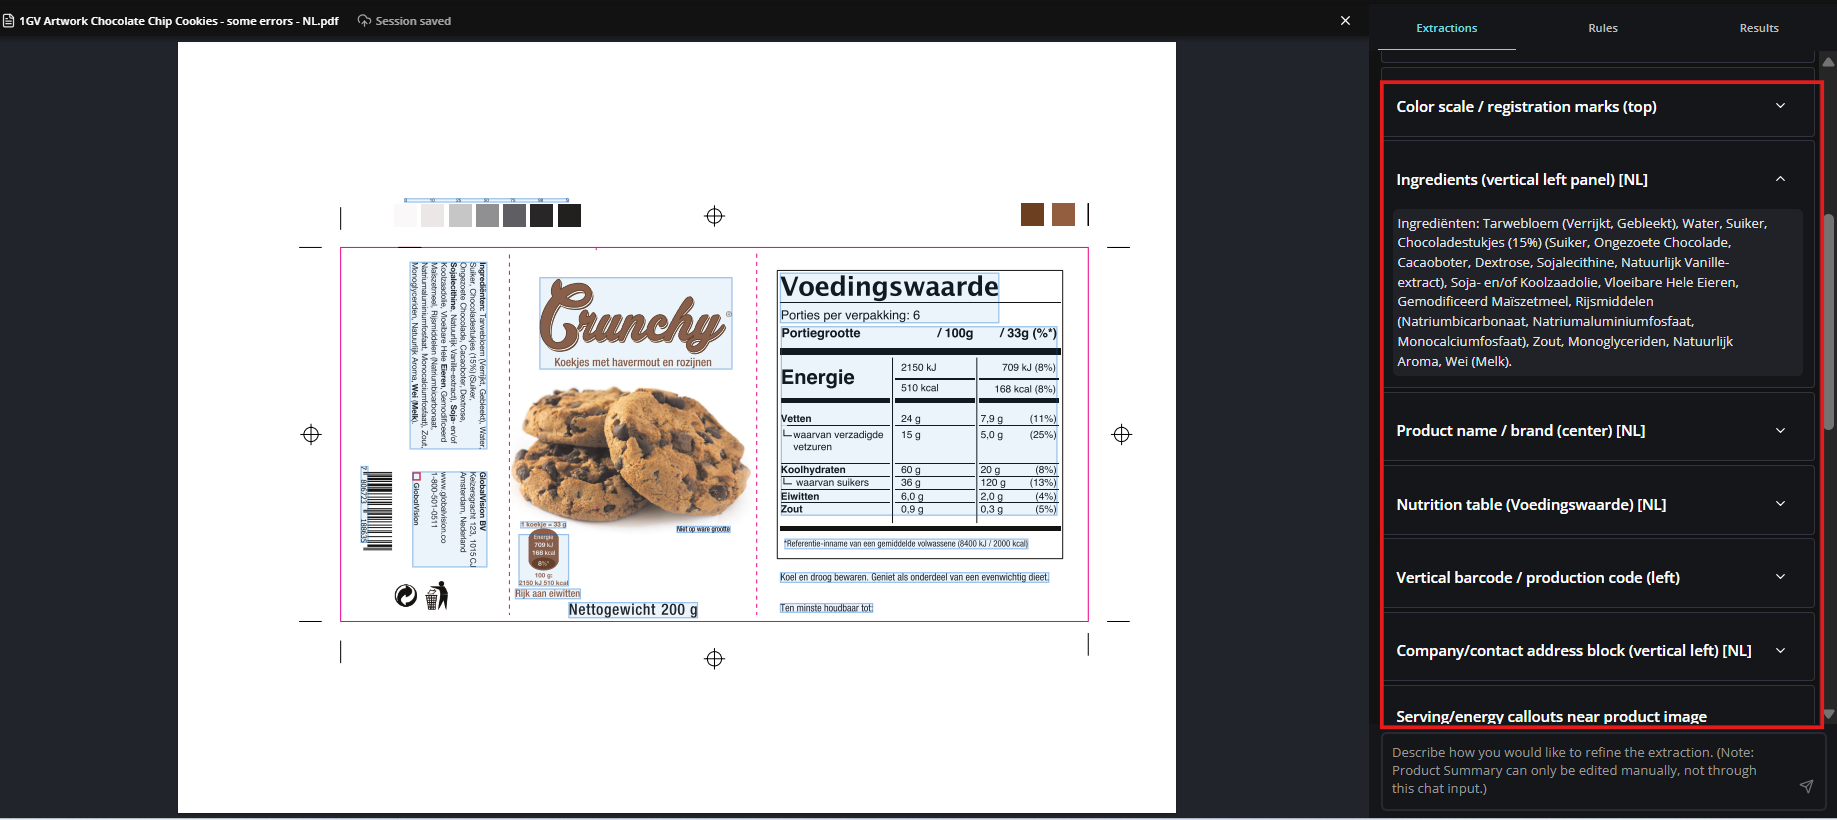
Navigating Extracted Categories
Clicking on a category on the extraction panel, or clicking on a highlighted section of your document will automatically zoom into that particular area of your file.
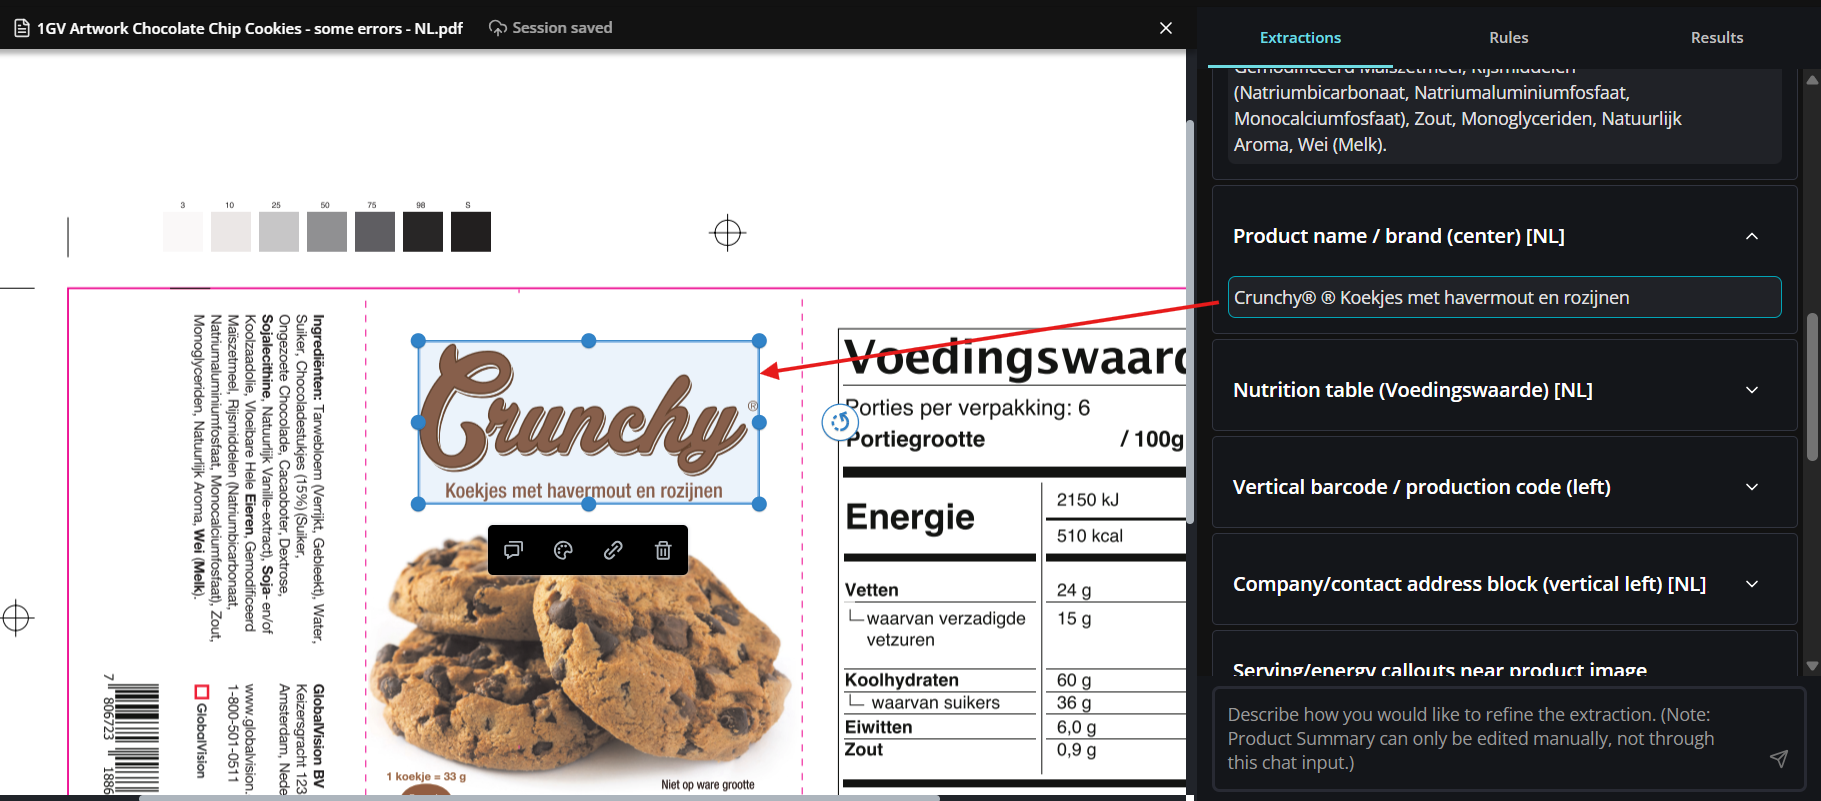
Refining Extraction
Although the ‘Product Summary’ section can only be edited manually, the content section below it can be edited both manually, or using the ‘refine’ feature.
The refine feature allows you to provide context to modify the extraction process in the content section. Use plain language and describe the way you would like to refine the content extraction.
3.0 - Rules and Rulebooks
The Rulebook section is where you define the standards that CheckAI will use to evaluate your document.
You can apply automatically fetched regulations based on your Product Summary or add custom rules to reflect internal guidelines or specific retailer requirements.
What is a rule in Verify CheckAI?
A rule is essentially a condition that must be met—based on either regulatory standards or internal criteria—and is applied to the extracted content to identify whether it passes, fails, or requires further input.
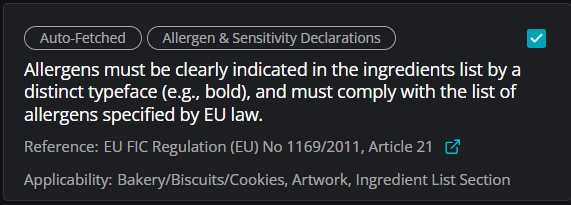
Example of an Auto-Fetched rule referenced from a regulatory body, about allergens requiring a distinct typeface.
This distinction can be bold, underlined, italic etc…)
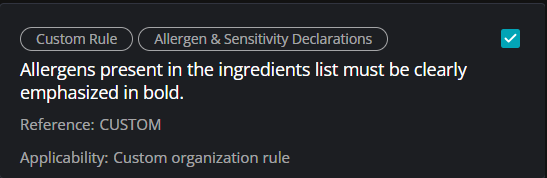
Custom internal rule specifying the exact form in which allergens are to be distinguished: Bold
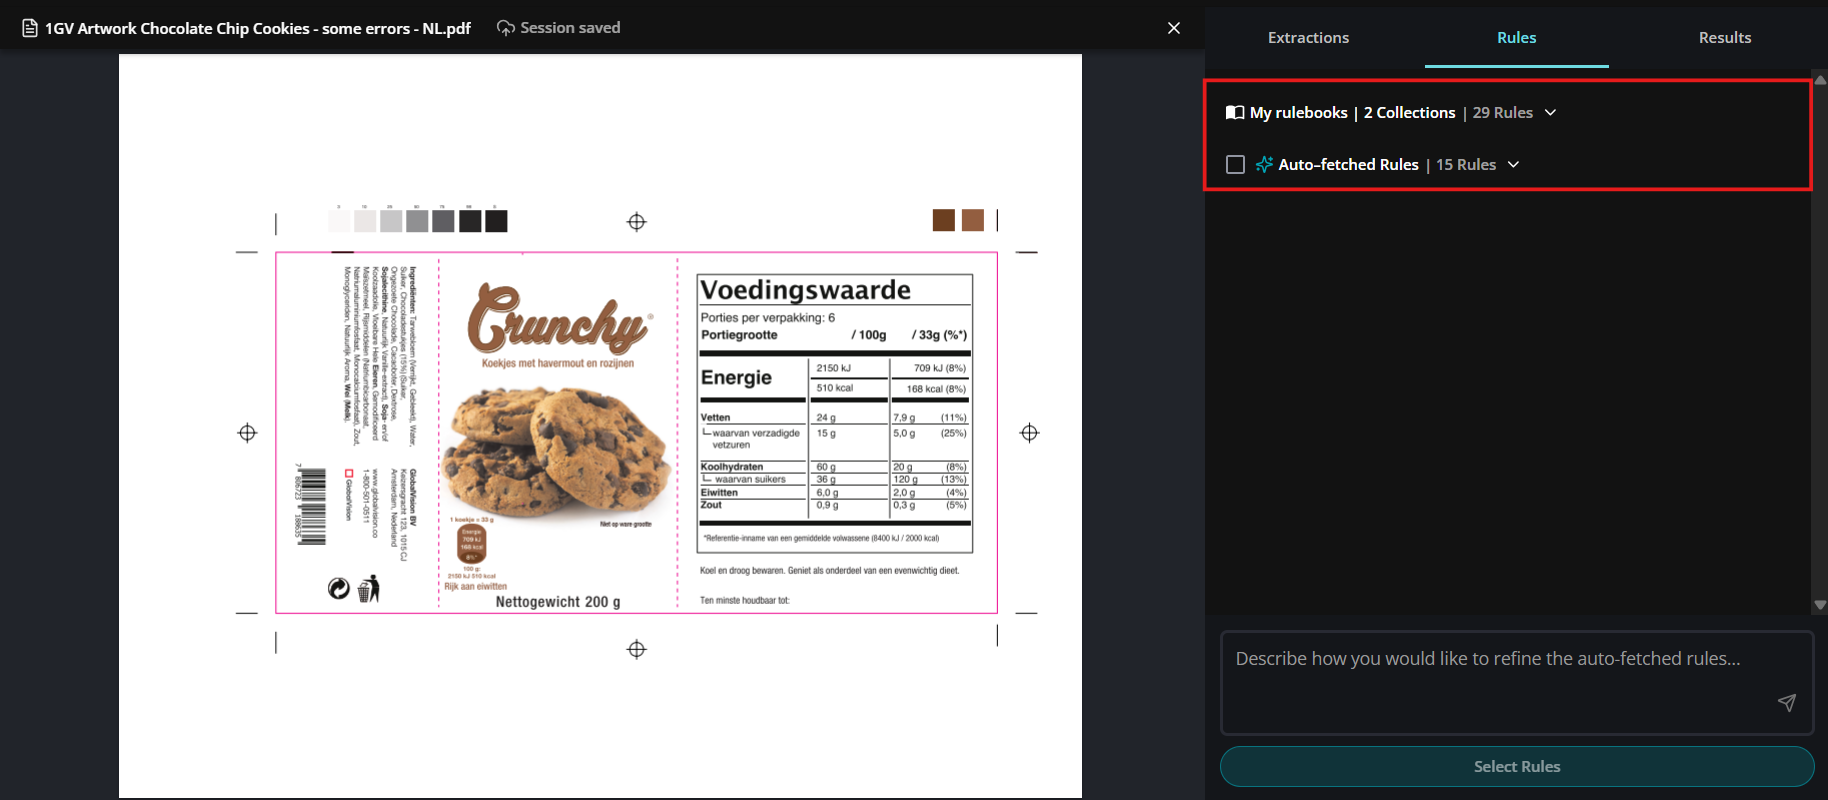
My Rulebooks (Custom Rules)
A Custom Rulebook allows you to define your own compliance criteria based on internal standards, brand guidelines, or specific retailer requirements. You can create rules in natural language or import them from existing documents, giving you flexibility to tailor the analysis to your exact needs.
To learn more on how to create custom rulebooks - refer to the Custom Rulebooks Management sections.

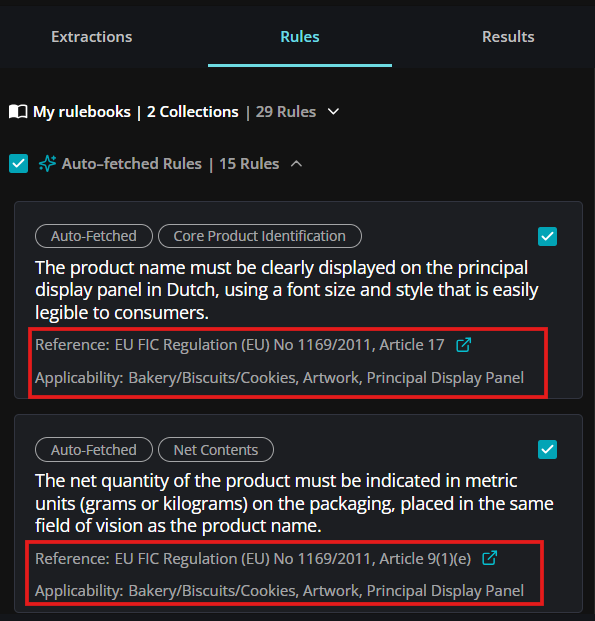
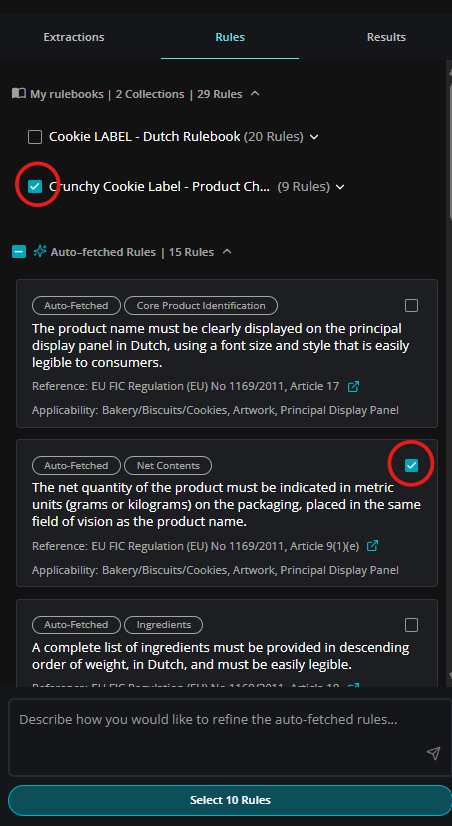
Auto-Fetched Rules
Auto-Fetched Rules are a curated set of the 15 most relevant compliance checks generated based on your Product Summary—especially the selected target market.
Using insights from the extraction phase, CheckAI identifies applicable regulations and pulls rules directly from authoritative regulatory bodies (such as FDA or regional equivalents).
Each rule includes a clickable citation link, allowing you to trace it back to its original source for full transparency and verification.
Selecting Rules
By selecting a rule or rulebook after the extraction phase, you are telling the system which ruleset to use when analyzing your document for compliance.
There is flexibility in how you can select and combine selections of rules to apply to your compliance check.
Selecting entire rulebooks vs Individual rules
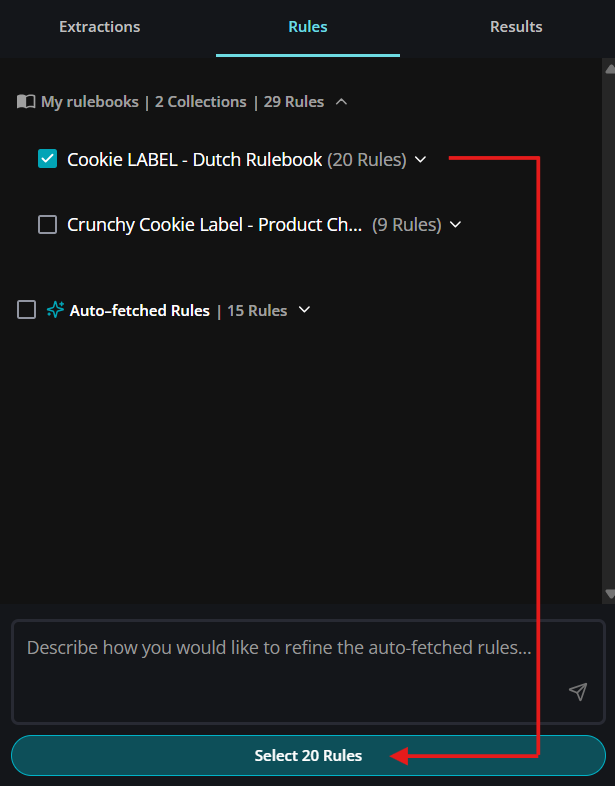
You can select an entire collection of rules (a rulebook) which will include all the rules in that list
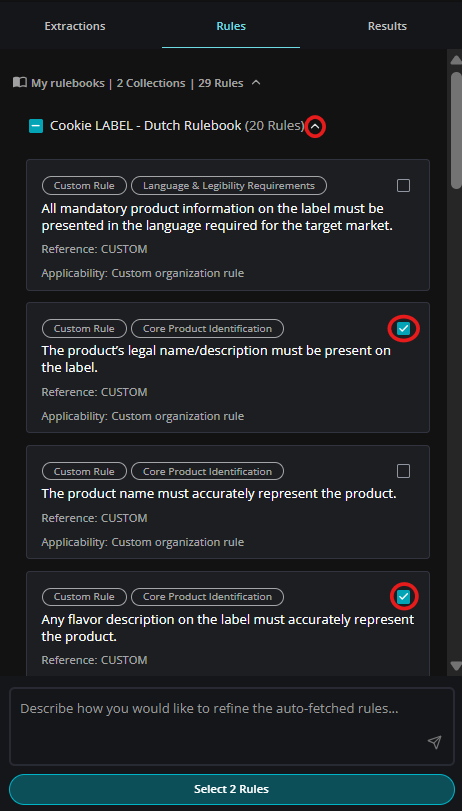
You can expand the list of rules in a collection and only select the specific ones you want to apply, or de-select the rules that you want to exclude.
Combining Rules and Rulebooks

You can combine different custom rulebooks together depending on your needs.
For example, a general guideline that applies to all products, and a specific rulebook that applies to a particular product line.
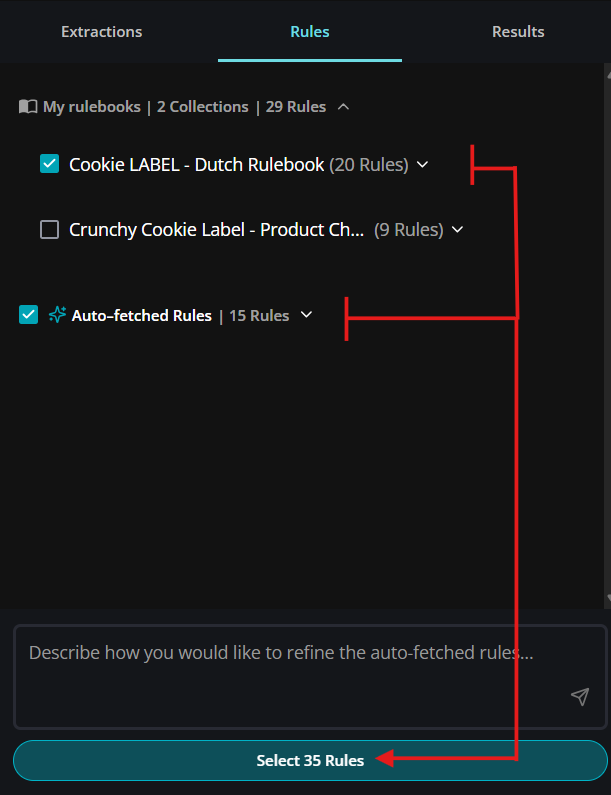
You can combine a custom rulebook with an Auto-Fetched rulebook.
You can mix entire collections with individual rules from other rulebooks.
4.0 - Compliance Analysis Results
The compliance analysis phase is where CheckAI evaluates your document against the selected rules.
Using the extracted content, the system checks each element for alignment with regulatory requirements and internal guidelines, identifying any violations, inconsistencies, or missing information.
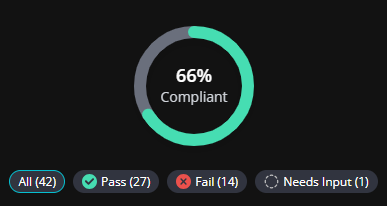
Results are then categorized into three clear outcomes: Pass, Fail, or Needs Input - along with an overall score to help you quickly understand the document’s compliance level.
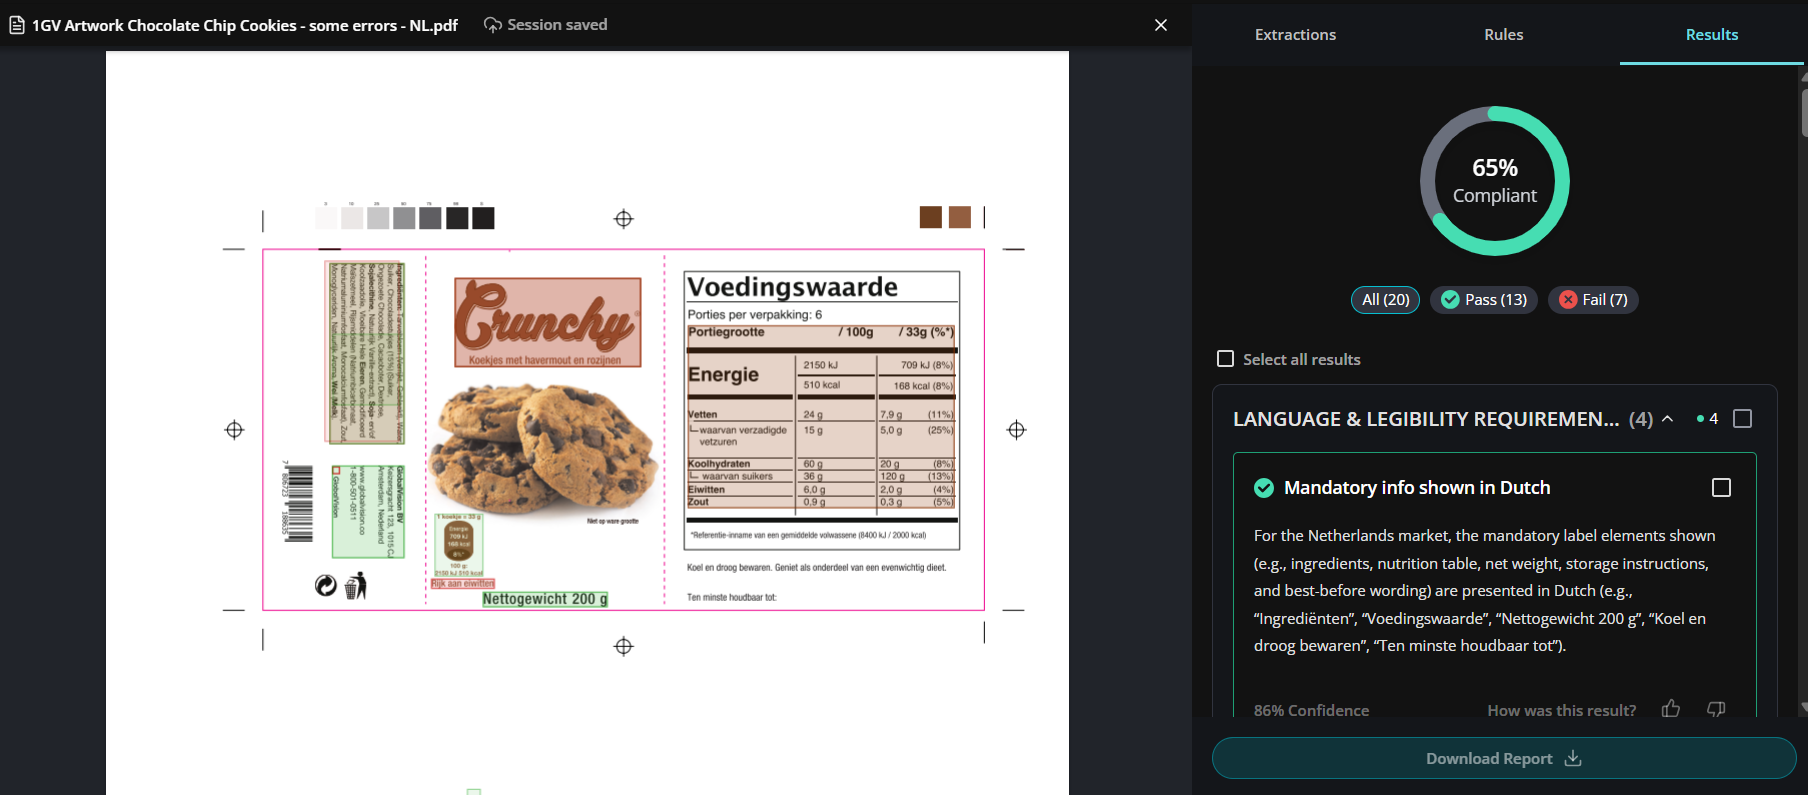
Reviewing Results
Results are organized into three categories to help you quickly assess compliance.
You can easily filter your results by selecting any of these categories in the results panel, allowing you to focus on the areas that need the most attention.
Pass: indicates that the content meets the conditions of the rule with no issues identified.
Fail: means a potential violation or inconsistency has been detected and needs to be addressed.
Needs Input: Applies when the system requires additional information or manual validation to complete the assessment.
Compliance Score
The compliance score is based on the ratio of passed checks to the total checks.
For example, 27 passed checks out of 41 total checks is a 65% compliance score.
(If you select pass on the 1 remaining check that is labeled ‘needs input’ the score will go up, or if you fail that check, the score will go down)
Viewing A Specific Result
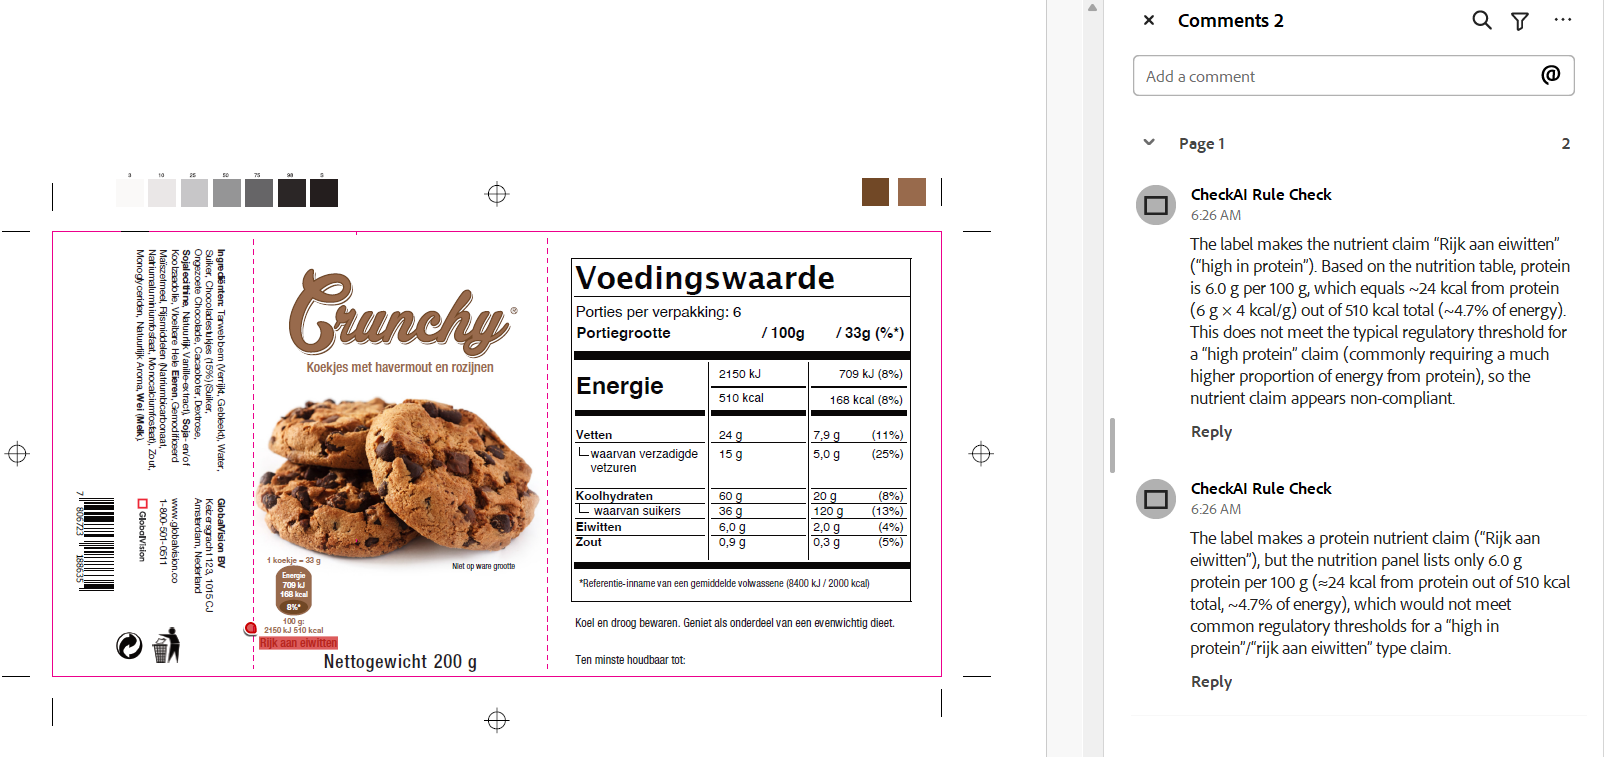
Clicking on a specific result focuses your view on that rule and highlights the exact area of the document it applies to. The UI uses color-coded highlights to make it easy to identify and understand each outcome at a glance.
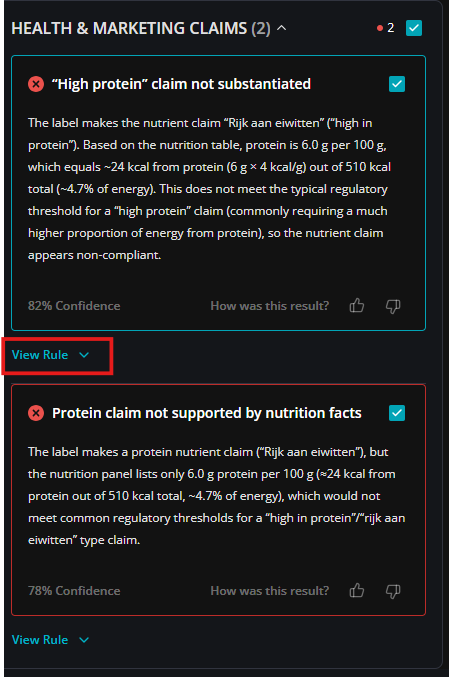
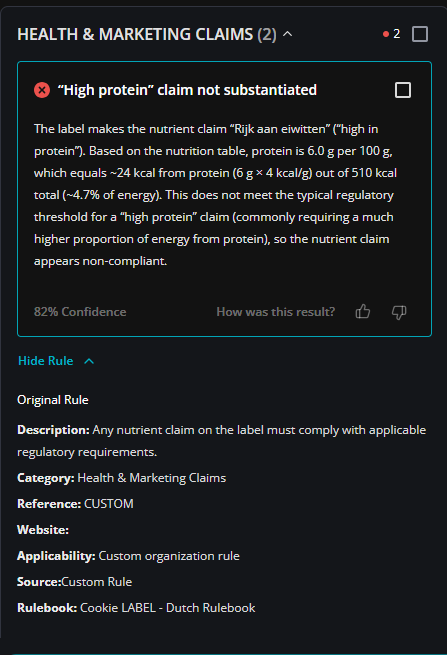
View Rule
Each result is tied to a specific rule used in the analysis. By clicking View Rule, you can expand and see the exact rule from your rulebook along with its references. T
his gives you clear visibility into what standard is being applied, helping you understand why a result was marked as Pass, Fail, or Needs Input.
Reporting Results
Reporting is designed to give you full control over what gets shared.
By default, no results are automatically included in the report. This ensures a human-in-the-loop approach where you decide what’s relevant.
As you review the outcomes, you can select specific results using checkboxes, whether that’s all items, only Pass or Fail results, or a custom selection.
Once selected, you can generate an annotated PDF report that includes those chosen items, making it easy to share targeted insights with team members or move forward through your approval workflows.
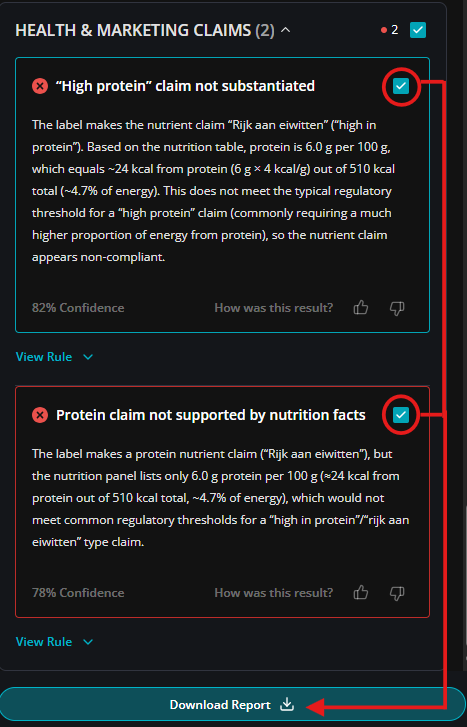
Example of an annotated pdf report from the selection above
5.0 - Custom Rules Management
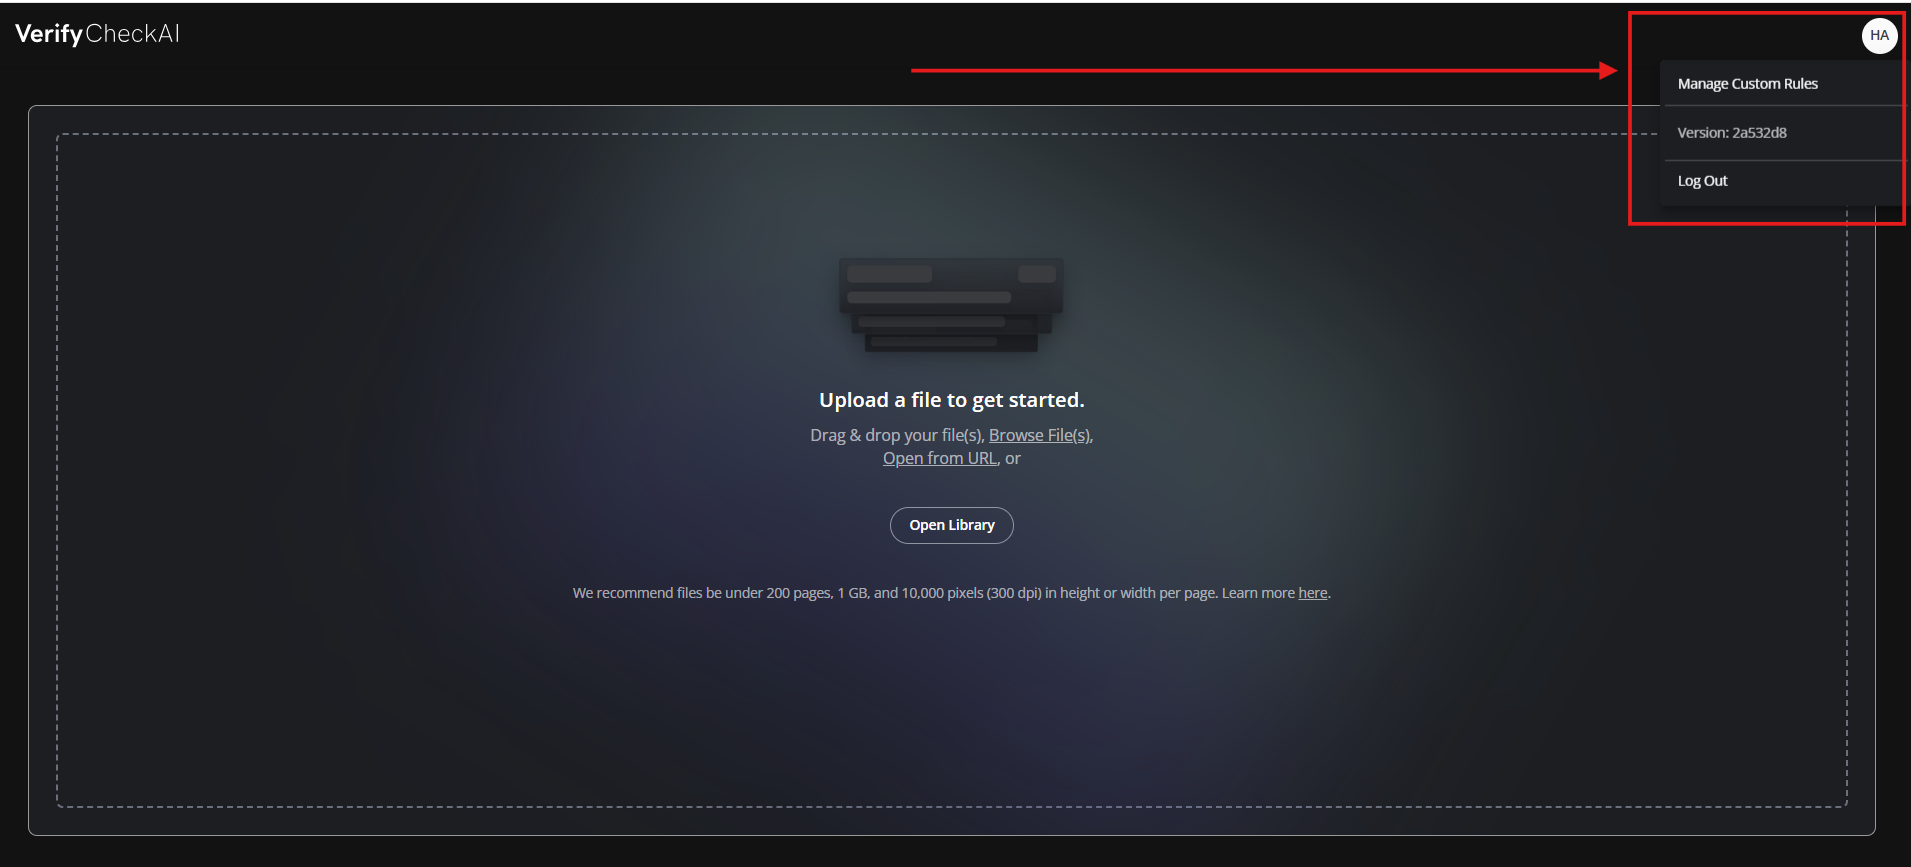
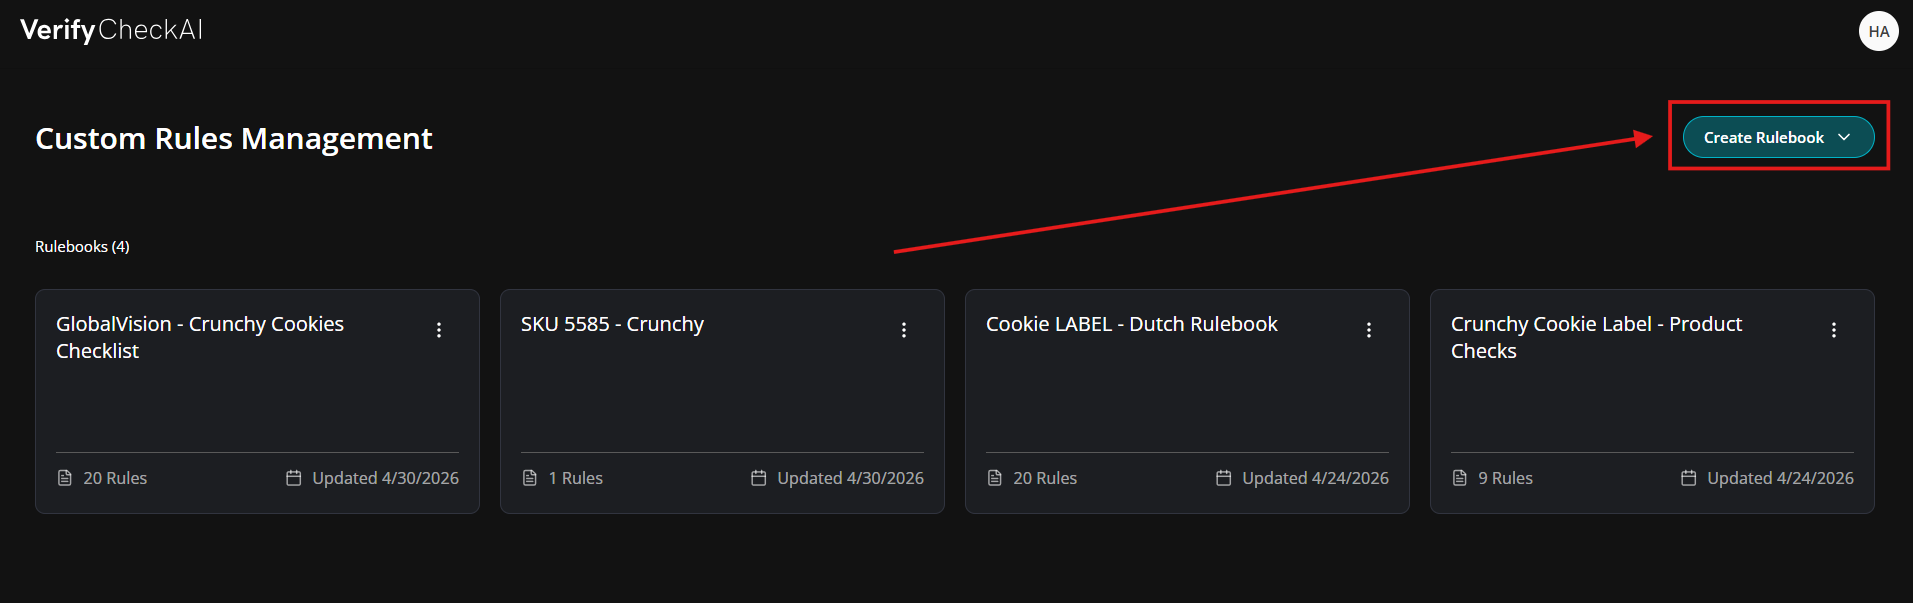
You can access Custom Rule Management directly from the home screen by clicking on your profile icon and selecting Manage Custom Rules.
This will take you to a centralized area where all your rulebooks are stored and managed.
Custom Rules Management
The Custom Rule Management section contains all of your saved rulebooks in one place. From here, you can create, review, and edit your rule sets to ensure they stay aligned with your internal standards and compliance needs.
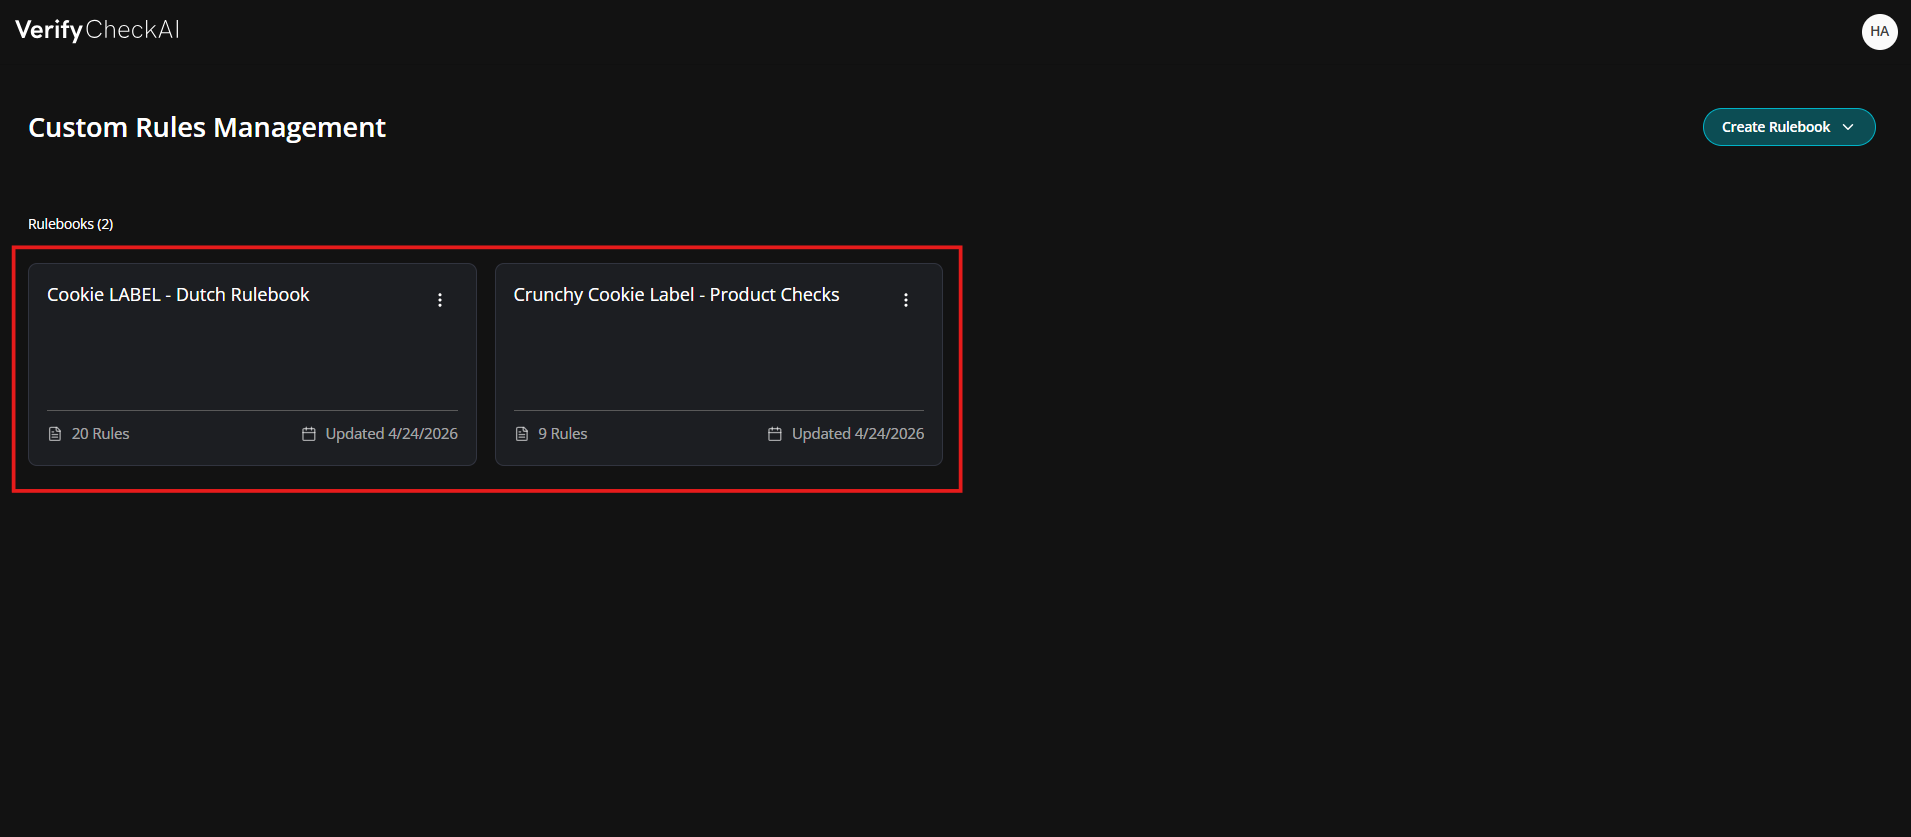
Managing Individual Rulebooks
Within each rulebook, you can access additional options to manage its contents.
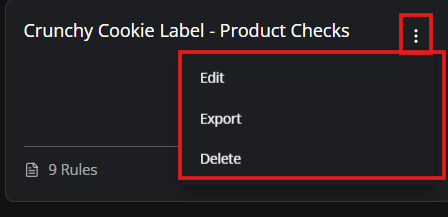
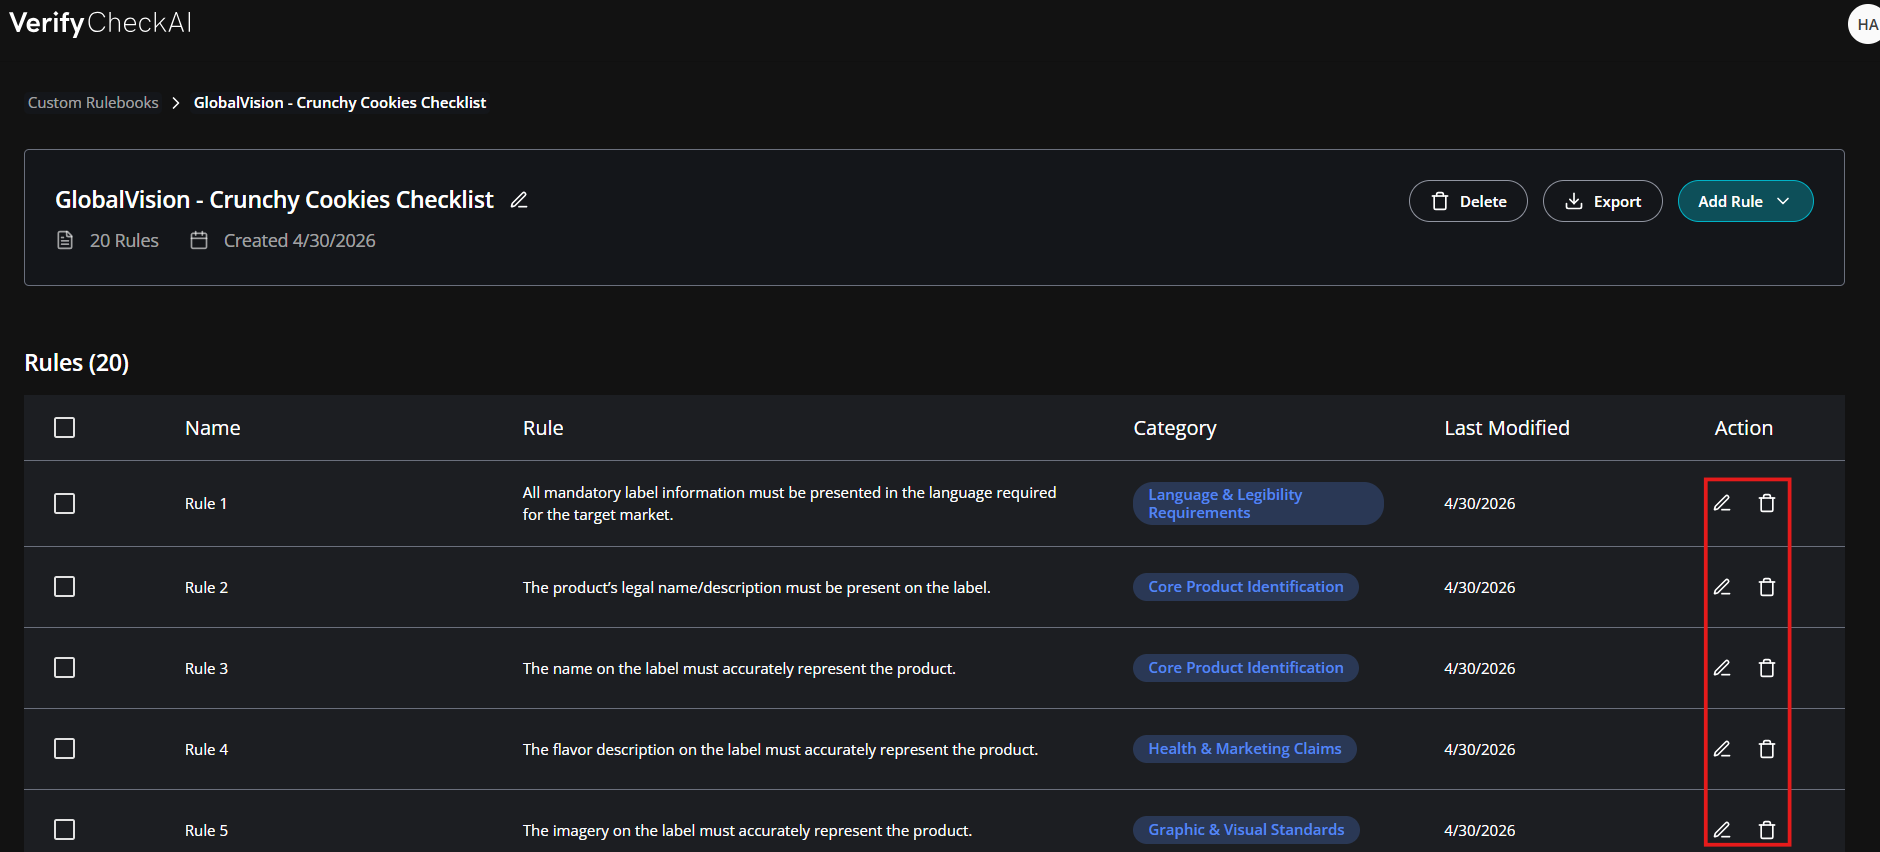
Edit: to modify or update individual rules within the selected rulebook.
Export: to generate a JSON file for sharing across teams or with support.
Delete: to remove the rulebook if it is no longer needed.
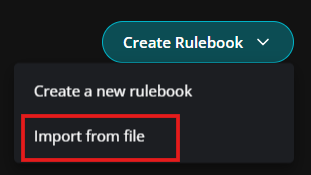
Creating Rulebooks
Rulebooks can be created manually by creating rules as a user.
More effectively, rulesets can be automatically created for you by uploading your guidelines and documentation to Verify CheckAI.
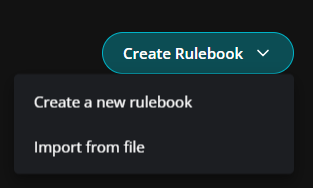
You can start by uploading your existing files—such as checklists, PowerPoint guidelines, or Excel sheets—to automatically generate a rulebook. CheckAI will extract and structure rules from these materials, giving you a strong starting point. From there, you can manually refine, edit, and clean up the rules to ensure the final rulebook meets your exact compliance needs.
Automatic Rulebook Creation - Importing Rulebooks
Rules can be automatically generated from your existing guidelines and documentation. Whether your standards are stored in Word documents, PDFs, PowerPoint files, checklists, or other supported formats, you can upload them directly into CheckAI.
The system will interpret the content, extract relevant requirements, and organize them into structured rules within a rulebook.
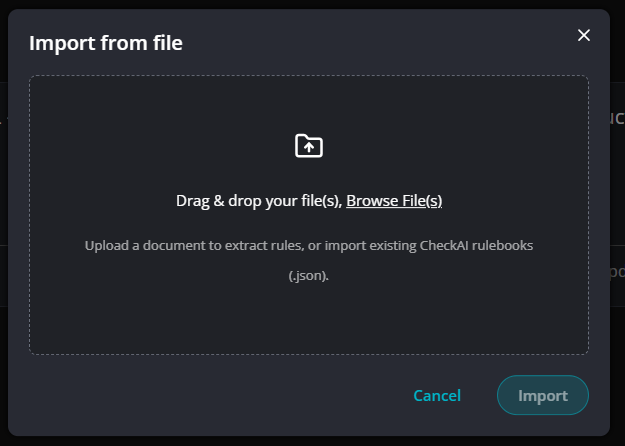
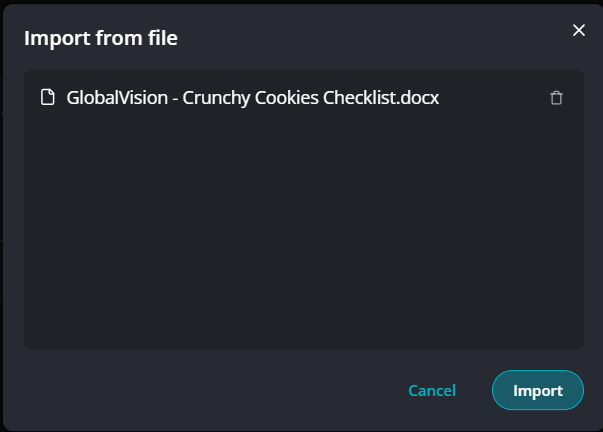
A a checklist saved as a word document is being imported.
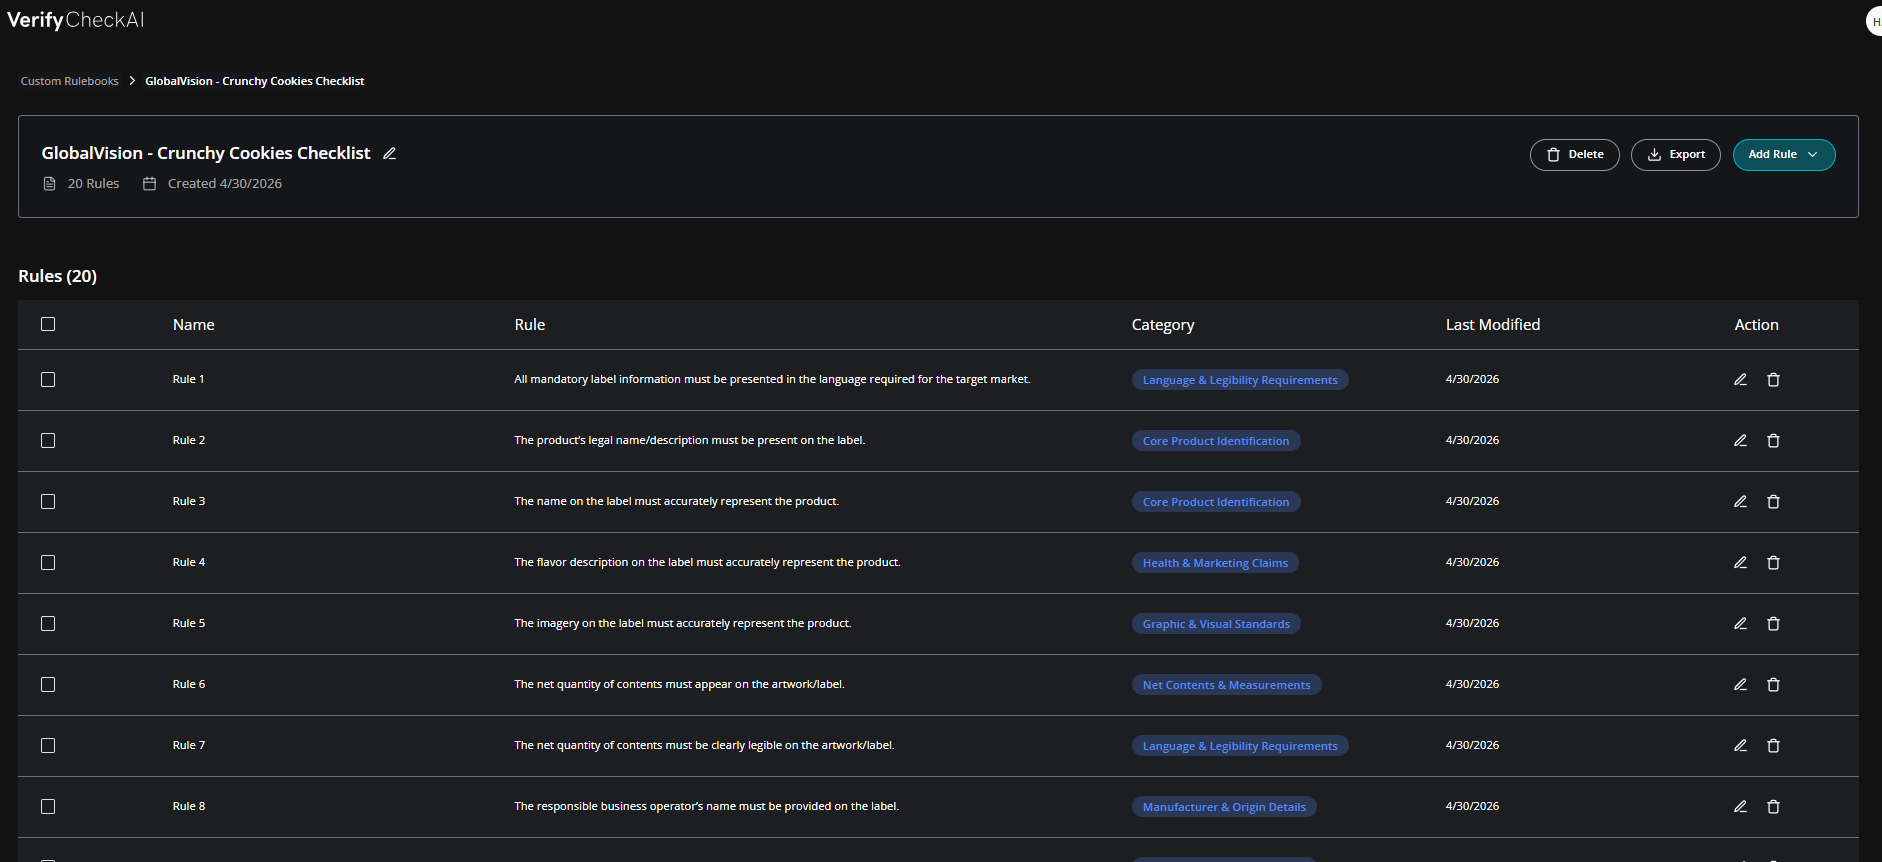
Rules have been automatically extracted from the uploaded file, sorted into categories and particular rules.
Document Requirements
Your source documents do not need to follow a strict format. As a general rule, if a person can read and reasonably understand the content, CheckAI can as well.
There’s no need for special structuring or formatting, making this a fast and efficient way to build rule sets from existing materials.
Reviewing and Editing Imported Rules
Once your rules are created, you can review and refine them as needed.
This includes editing rule content, removing unnecessary rules, or reorganizing them to better fit your needs. This step ensures your final rulebook is accurate, relevant, and aligned with your compliance standards.
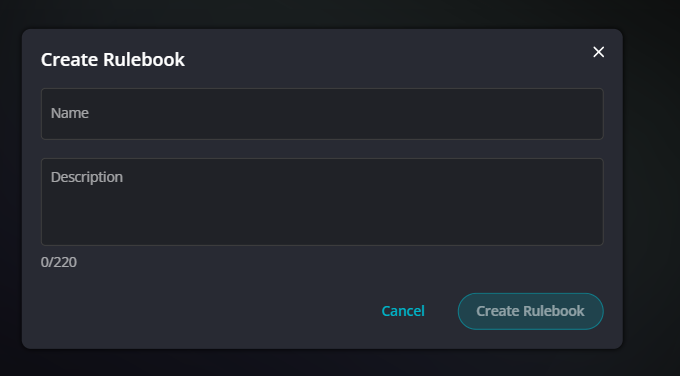
Manual Rulebook Creation
When creating a rulebook manually, you can assign a name and description to help organize it by use case, product type, or compliance requirement.
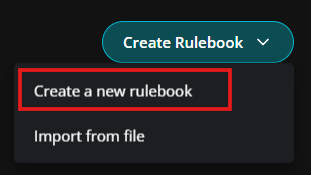
Adding Rules
After a rulebook is created, you start adding rules by selecting Add Rule.
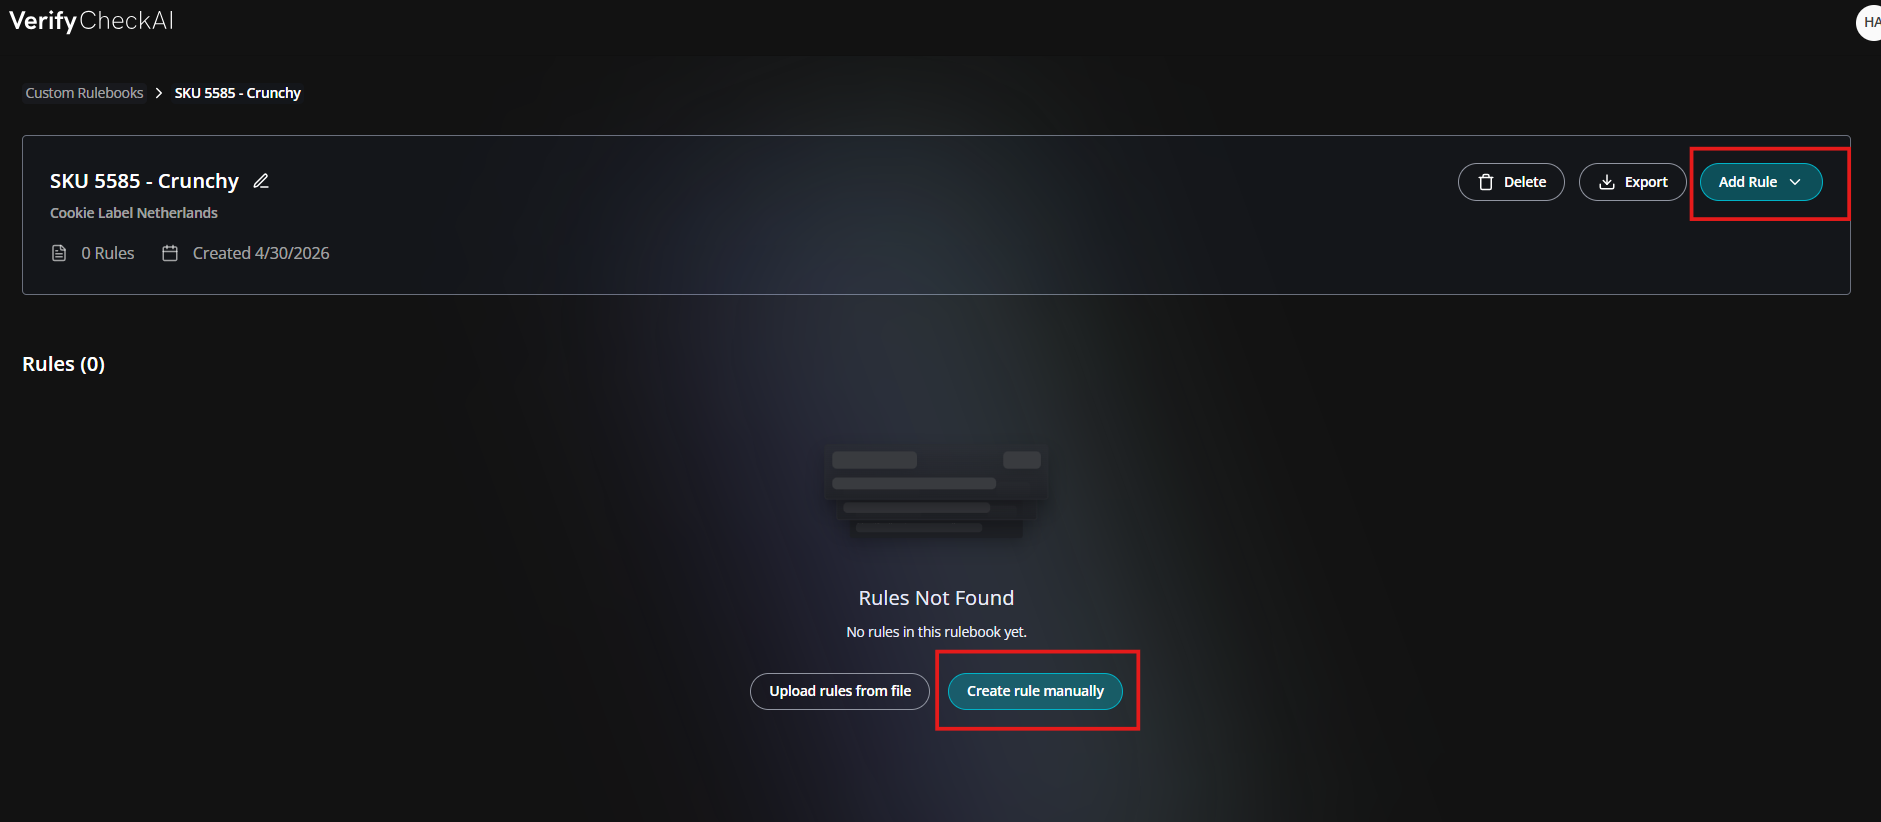
Each rule may include a title and category (optional), along with the rule content.
The rule content is the key component, as it defines how the AI evaluates compliance. Rules should be written in clear, natural language, similar to prompts used in AI systems.
Creating good rules will help improve your compliance workflows - refer to our best practices guide (or FAQ) for tips on how to create good rules. (To be Written)
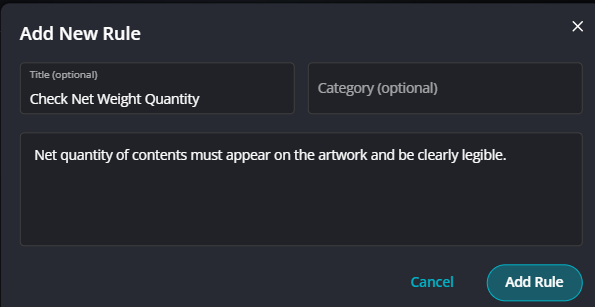
To make changes, select Edit on any rule. This allows you to update the title, category, or rule content as needed.
