Text Inspection - Pre-Inspection Tools (Master and Sample)
Summary
This section describes the Pre-inspection tools needed before running Text inspection.
Note: The tools in this section are only available for Text Inspection.
Pre-Inspection Tools
Live Text

The ‘live text’ tool shows all live text (in Text or Spelling Inspection modules) in the Master or Sample panel:
To show live text:
Click on the corresponding Live Text icon.
To remove live text:
Click the icon again.
Note: Text that is not live can still be inspected as part of a pixel-to-pixel comparison between two similarly laid-out files in Graphics Inspection.
Cross-Out Text Tool

Cross-out allows you to cross out a text to be excluded in the inspection. The text is crossed out in red.
To cross-out Text:
Click the Cross-out Text icon in either the Master or Sample panel.
Click and drag the crosshair icon that appears as the cursor, over the text, to be excluded in either the Master or Sample panel. Multiple selections can be made simultaneously.
To apply a cross-out to different portions of a multi-page file:
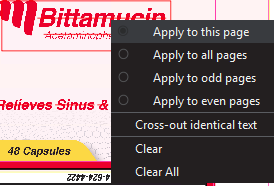
Right-click on the crossed-out text.
In the “Context” menu that appears, select to apply the cross-out to all pages, odd pages, even pages, or identical text elsewhere in the file.

Clear removes cross-outs that are selected, Clear All removes all cross-outs.
To cancel out Cross-out text using Underline Text:
Click on Underline Text.
Click and drag the crosshair icon that appears as the cursor over the crossed-out text.
The cross-outs are removed.
Note: Cross-out Text and Underline Text cannot be applied together in the same file unless it is to cancel out the other.
Underline Text Tool

Underline Text lets you select text to be included in the inspection.
To underline a Text:
Click Underline Text on the selection toolbar and then click and drag the cursor to select the desired text. The text is underlined in green.
To apply underline text to different portions of a multi-page file:
Right-click on underline text.
In the “Context” menu that appears, select to apply the cross-out to all pages, odd pages, even pages, or identical text elsewhere in the file.
Clear removes underlined text that is selected, Clear All removes all underlined text.
Create Zones

Create Zones can be used to perform partial or targeted inspections. The user can specifically include sections of a given document in Text inspections (excluding all other text) and compare them directly to the corresponding portions in the other panel.
To create a Zone:
Click the Create Zones icon.
Click and drag the crosshair icon that appears as the cursor over the text to be included. The text is highlighted and an ID is assigned. You can initiate a zone on the Master file only.
Highlight the corresponding text in the Sample. A corresponding ID is assigned.
Note: The Zoning sub-panel pops up in the Sample panel as a guide for which matches are available. Clicking on a match zooms in on that selection.
Create new zones by clicking and dragging separate portions of text in each panel and repeating the overall process.
To add to an existing zone:
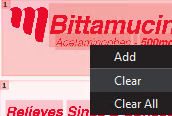
Right-click on a zone that has already been selected, prompting the “Context” menu to appear. Select Add.
Click and drag the cursor over a new portion of text. The same number designation of the original zone should appear at the top of the new selection. Repeat the process in the other panel if necessary.

To clear a zone:
Right-click on a zone that has already been selected, prompting the “Context” menu to appear.
Select Clear to delete a zone on either panel and Clear All to delete all zones in both panels.
Note: Clear also deletes the original zone if you had right-clicked on an added portion.
Clear Markups


To clear all underlines, cross-outs, or zones:
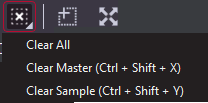
Click the Clear Markups icon.
Select which file to clear; Master, Sample, or all.
A message appears, asking if you want to continue.
Click Yes.
Note: OCR tool has been removed for Text Inspection in GVD version 5.9.0 and above. Please refer to our Archived Functions section for details regarding this tool.
