Swivel Monitor Arm Assembly Guide
Note: Do not fully tighten any bolts until every part is assembled.
Instructions
The following instructions are to assemble the Swivel Monitor Arm:
Swivel Monitor Arm Assembly Parts
Assembly Parts List
| 1 | # | Part Name | Quantity |
| 2 | 1 | Monitor/Keyboard Plate | 1 |
| 3 | 2 | Diagonal Monitor Swivel Arm | 1 |
| 4 | 3 | Bolts | 8 |
| 5 | 4 | Small Hex Screws | 6 |
| 6 | 5 | Monitor Mounting Spacers with Bolts | 4 |
| 7 | 6 | Monitor Mounting Spacer Nuts | 4 |
| 8 | 7 | T-Handle Allen key 3/16" | 1 |
| 9 | 8 | T-Handle Allen key 3/32" | 1 |
GlobalVision Swivel Monitor Arm Assembly Parts List
Diagonal Swivel Arm
Step 1
Connect the Diagonal Monitor Arm (Ref Table 1: Part #2) to the right-side leg of the table or stand. Place the monitor arm so that its front and back attachment plates align with the (four) bolts entry points on each side. Place and fasten the four bolts on each side.
Note: The image below is not an actual representation but a reference to where the Swivel Arm connects to.
Bolts Entry Points
Step 2
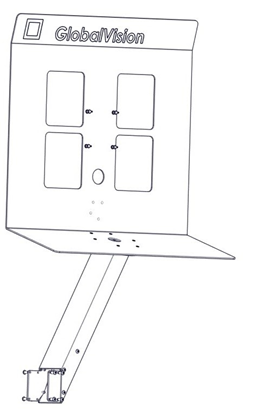
Attach the Monitor/Keyboard Plate (Part #1) to the top of the Swivel Arm (Part #2) using the 6 small Hex Screws (Part #4) provided as shown below.
Attach Monitor/Keyboard plate with Swivel Arm
Step 3
Next. Attach the four Monitor Mounting Spacers (Part #5) to the back of the monitor as shown below.
Attach Monitor Mounting Spacers
Step 4
Next, attach the monitor to the monitor plate using the four nuts (Part #6) provided with the Spacers.
Attach Monitor to Monitor Plate(1)
Attach Monitor to Monitor Plate(2)
Step 5
Tighten all the bolts to ensure the assembly of the table or stand is safe and ready to use.
Assembly Guide PDF:
Swivel Monitor Arm Assembly Guide rev.001.pdf