Text Inspection - Post Inspection Results Viewing
Summary
This section describes the post-inspection results viewing process and steps, needed after running any text inspection.
Post Inspection Results
Difference List
The Difference List displays the differences between the Master and Sample files for easy reviewing and proofing. The column headings include the Filter Differences icon, ID, Page, Type, Master (the difference as it appears in the Master), Sample (the difference as it appears in the Sample), Comment, and Level.
With the exception of the Filter Differences icon, click any heading to sort the list based on the contents of that column. By default, the list is sorted by the Difference ID.

To select a difference:
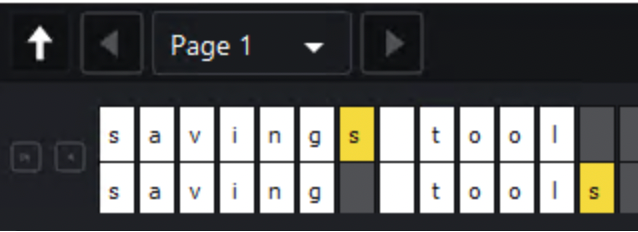
Click on the difference in the Difference List. It gets highlighted in the Inspection View and displays in the Change Grid below the two panels. The characters in yellow in the Change Grid represent the differences between the Master and Sample panels.
Note: Hover on any character in the Change Grid to display its Unicode value and name.
To group duplicated differences, Select the Group Duplicates option on the Top-left of the Differences panel.
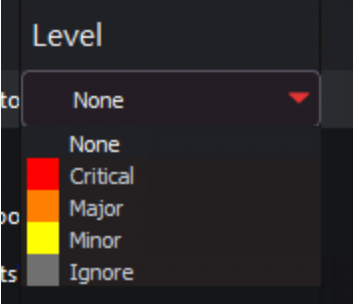
To assign a level to a difference:
Select the difference in the Difference List. Click the Level drop-down box and select the level.
Note: Hotkeys (F1 – F5) may be applied to assign levels. Select the difference and click the appropriate "F" key (see below):
| 1 | Key | Function |
| 2 | F1 | Reporting level - Critical |
| 3 | F2 | Reporting level - Major |
| 4 | F3 | Reporting level - Minor |
| 5 | F4 | Reporting level - Ignore |
| 6 | F5 | Reporting level – None |
To assign a level to multiple differences:
Hold down CTRL while selecting the differences, click the Level column in one of the selected rows, and select the level.
Note: On a Mac OS, to assign a level to multiple differences, hold down the COMMAND and SHIFT keys while selecting the differences, click the Level column, and select the level.
To remove a level assignment:
Click the Level column and select None. The level no longer displays in the Difference List.
To assign a comment to a difference:
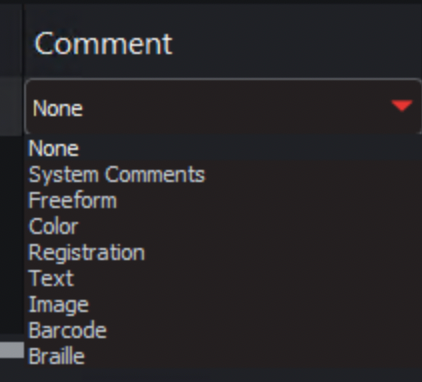
Select the difference in the Difference List. Click the Comment column and select one of the predefined comments that appear. The selected comment displays. Descriptors (or system comments) appear as the default for Change, Size, Font Type, Bold, Italic, Hyphen, Underline, Color, Line Break Space, and Sub/Super-type differences.
Note: Select System Comments in the drop-down to reset the default comment for that specific difference.
To assign a comment to multiple differences:
Hold down the CTRL key while selecting the differences, click the Comment column, and select the comment.
Note: On a Mac OS, to assign a comment to multiple differences, hold down the COMMAND and SHIFT keys while selecting the differences, click the Comment column, and select the comment.
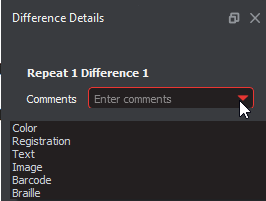
To assign a customized comment to a difference:
Select the difference in the Difference List, click the Comment column, select Freeform, and type in the Comments text box in the Difference window that appears. Click OK for it to take effect.
To delete a comment from a difference:
Click in the Comment column in the Difference List and select None.
To exclude a difference:
Select the difference in the Difference List and click F12.
Note: An administrator or user groups with Review settings access, can configure the Application to force the inclusion of all differences, in which case clicking F12 does not have an effect.
To filter Differences:
Click the Filter Differences icon.
Ensure the difference types desired to appear in the Difference List are checked by either checking/unchecking them individually, clicking Select/deselect all.
This will toggle all difference types on or off, or clicking Defaults, which resets the selections.
Click Filter to return to the filtered Difference List and see the desired difference types or click Cancel to disregard the selections and close the window.
Note: Differences excluded from the Difference List via the Filter function still appear in the generated report.
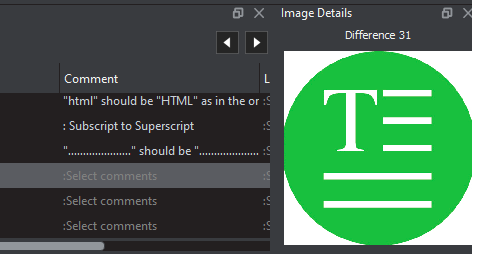
Image Details Panel
The Image Details panel displays image differences during text inspections. Switching between displayed differences is as simple as clicking on a new image difference in the Difference List.
To assign comments and levels to an image difference, follow the same processes outlined for other difference types.
Note: Image differences only display when the Images difference type and the Include Images comparison option are checked on in the selected profile. None of the default Text Inspection profiles have either option checked. Only administrators and managers or user groups with ‘modify profile’ access, can create new profiles with these options turned on. For more information, consult the Administration Guide.
To switch between displayed differences:
Click on a new image difference in the Difference List.
To assign comments and levels to an image difference:
Follow the same processes outlined for differences of other types.
Note: Image differences only display when the Images difference type and the Include Images comparison option are toggled on in the selected profile.
Text Inspection profiles have neither option checked. Only administrators, managers, or user groups with ‘modify profile’ access, can create new profiles with these options turned on.